Strike a pose. Vogue

It’s been a while since I shared my initial plans to create a space to craft, and while it’s worked out well there have been some additions and changes along the way. The pegboards have been excellent for storage in a space that otherwise wouldn’t have been used, and even though they’re in a cupboard it’s great that they keep things so organised.

But actually the biggest game changer has been the additional desk top - and space that provides - that we added earlier in the year. I don’t know why, but now I just seem to get so much more done and without moving piles or stuff, or projects as I like to call them! Maybe that’s why…

I’m still very much liking the plain white walls, though a couple more things have found their home hanging on the walls here - there’s the colour wheel plate which is already up, and I plan to add a picture which I brought back from my travels, or more precisely from my stopover in Singapore way back in 2000, underneath it.

I thought I was done picture wise.

But it turns out I’m not.

As soon as I saw these at my sewing group’s recent stash sale I knew that some would end up on the wall in my craft room. But how many? I guessed three would work, as I think things in odd numbers always look better. But which three? Eventually I narrowed it down and left with these three images from a vintage Vogue pattern catalogue, thought to date back to 1949/50, and I couldn’t be happier.

Each of them makes me smile for many reasons, and not just for the illustrations which in so many ways reminded me of those I shared from the Biba exhibition recently, but also for the memories of flicking through pattern catalogues in shops which have long gone; The Button Shop in South Norwood High Street and Allders in Croydon are just two that spring to mind.

1 The Jacket Dress

This was actually the last of the images I chose, and it was chosen to balance colour-wise alongside the two-piece dress further below, but that wasn’t the only reason. I’m not so good with jackets, and have few in my wardrobe, though I did fall in love and buy one last summer, and I’ve worn that precisely, once!

But as the text says ‘the jacket-dress is a staunch friend of the busy woman who is in a whirl of activities thoughout the day’ - maybe I just don’t have enough whirl to my activities, though of course with this I would!

2 The One-Piece Dress “Easy-To-Make”

Ah yes, the ballgown which is labelled as easy to make. Yes, I’m sure it is if you’re an expert sewer, and maybe that was the market when the catalogue was published. However I loved the drawings, and was quite taken with the pink version, and the tiny waist.

Looking at the sizing table though, and another indication of how things have changed. A size 14 with a 32 bust - today’s size 14 is usually a 38-40 bust.

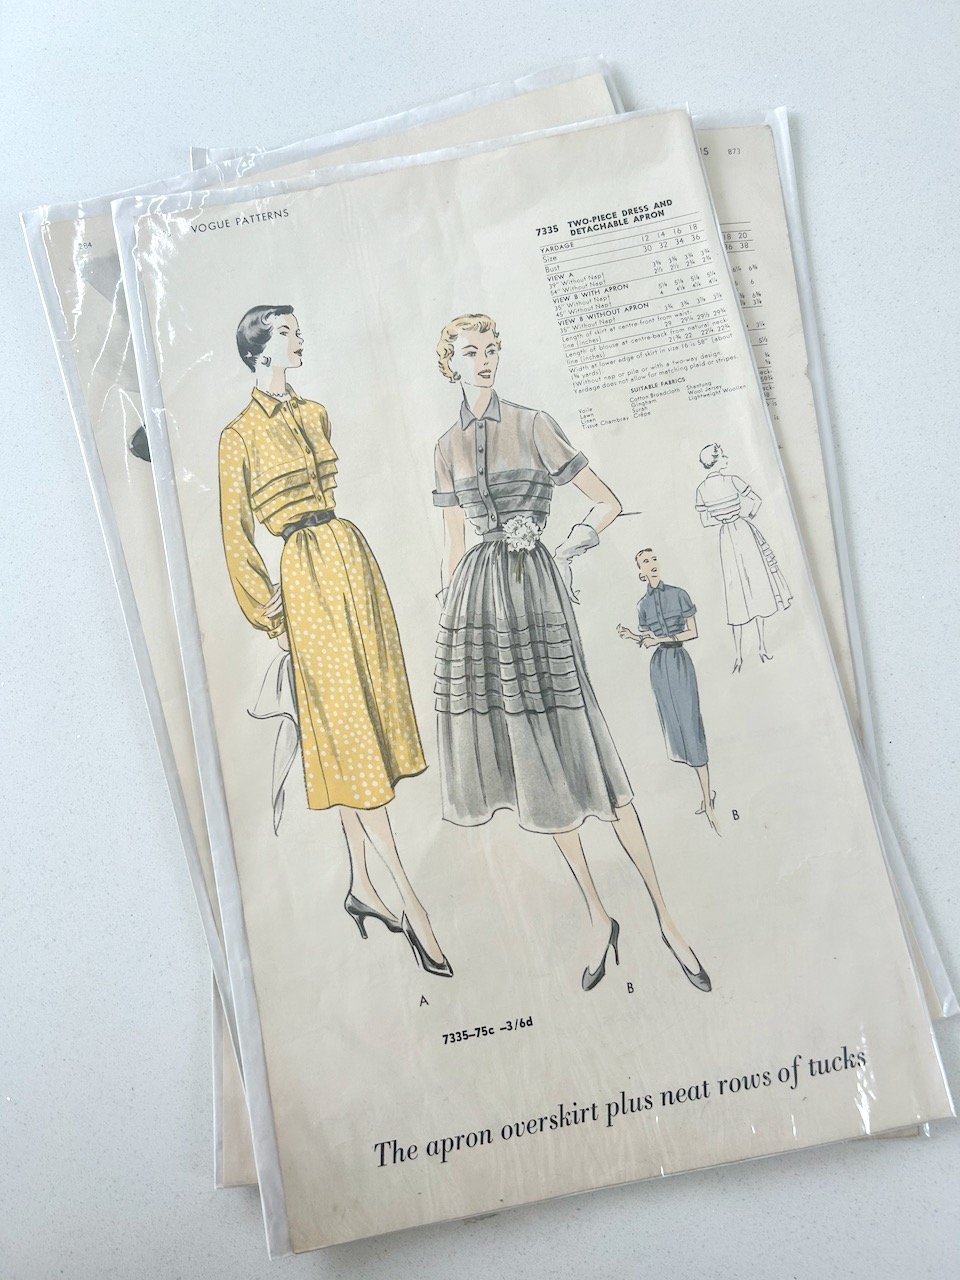
3 Two-Piece Dress and Detachable Apron

Indeed, it’s what my wardrobe has been missing! Not. This was the one the first caught my eye. The style of the dress itself is hardly dated at all, but the idea of having an ‘apron overskirt’ is a whole other world away isn’t it. It’s a glorious part of history though, and I know all of the illustrations will look great on my wall.

The stash sale itself was a really friendly and sharing event. Everyone was keen to see everyone’s purchases and new treasures. These illustrations drew some admiration, and I got talking to two older ladies who shared that their mothers had ‘done the housework in their Sunday best’ as that’s what was done then, so the apron would have been a useful addition. One lady recalled how her mother used to have a bath in the afternoon, after the housework and before cooking dinner for when her husband arrived home.

I was speaking to my mum shortly after and recalled the stories above, mum retold a story about her nan always having her best underwear on when she went out, even if that was across the road to the shop, just in case she got run over. It gives a lot of credence to the old adage doesn’t it? Anyway, onto framing my pictures.

Framing them

My plan now (or well soon) is to get these custom-framed, as they’re not a standard size so it’s not as simple as just buying a frame, or as cheap! We’ve had some artwork framed since we moved here, but sadly the shop that did this (and did them very well) has now closed, though they recommended another shop in town, so I’ll have to check that one out.

My thoughts are to have a very simple, thin frame. Ideally I’d like a metal frame but I don’t think my budget will stretch to that (but I’m happy to be proven wrong!) so my second choice will be a metallic coloured frame - I’m nothing if not resourceful! But we’ll see. I’ve also worked out that with a narrow frame, all three can hang side by side which is my preference.

So it’s a watch this space, but in the meantime every time I see them I can’t help but smile and think this is the best £3 I’ve probably ever spent.

My favourite garden and awarded the Best Show Garden, the Eco Oasis Garden

* I was invited to the press preview of Gardeners’ World Live and provided with a pair of tickets to visit the show, therefore all my posts will be marked as 'Ad’ though as usual my views and opinions are very much my own.

As we wandered amongst the gardens I had an early clear favourite, and it was this garden designed by Dan Hartley. The corten steel drew me in, and the lush planting kept my eyes busy while looking at the planting at multiple heights and the small details like the insect hotel (bottom left in the first photo below), and the tin watering can (to the left of the seats in the second photo) and the bottle of rose temptingly placed on the table in the seating area!

But it was more than that, it was the feeling of calm as I admired the garden and it’s hard to explain. It wasn’t as intense a feeling as when we first descended into Hunte’s gardens in Barbados but it was along the same lines - and for any garden to give you ‘all the feels’ well, it has to be good doesn’t it?

This garden was inspired by the Gardener’s World Live theme of ‘The Good Life’ and aims to combine eco-friendly elements, aesthetic appeal and mindful living. The show notes say that ‘organic abundance is represented by vibrant, lush planting’ and that the garden invites people to experience the beauty of a balanced and environmentally conscious outdoor space. The garden is designed to be maintained with organic gardening principles and integrates simple water conservation and aims to enhance the natural ecosystem, which all in turn allows people to create their own ‘good life’.

And so I was pleased to see my favourite garden at the show awarded the Best Show Garden - of course, I had no say in it whatsoever, but it clearly appealed to many more people than just me.

Now wouldn’t it be nice to crack open that bottle of rose? Well, once it’s been on ice anyway!

* With thanks to Gardeners’ World for inviting me to Gardeners’ World Live, it was just as good as I expected! I’ll be sharing more from my visit to the show - I hope you enjoy it as much as I do.

Four pink hearts and a hug

I’ve made another quilt as part of my quilting ‘stretch’ project this time using the March block from Sherri at A Quilting Life’s mystery block a month. As I said then I don’t know if I’ll manage to make a quilt a month, but I won’t really know unless I try…

I’m glad that this block was relatively simple to put together as time has been more challenging this month, perhaps the warmer weather or something else, I’m not sure quite why, but I only finished it after a concerted push last night…

My fifth donation quilt

As soon as I saw the centre block was a heart I knew that I’d be using pinks from my stash - but which ones! The pile of pinks on the right of this basket are (from top to bottom) from an old quilt cover, two old shirts, the old quilt cover again, a mystery plain pink and remnants of a much loved Boden sundress. I’ve no recollection of where the plain pink material has come from so perhaps it was part of a mystery bundle I picked up somewhere.

The paler pinks which I’m using for the hearts are likely to be much older and acquired at some point from mum’s stash, and the paler background is from the lining of the sundress. As you’ll see as this post progresses I also added some grey zigzagged material from an old duvet, which was also the backing on last month’s quilt.

Testing the block

As you know I’m making test blocks ahead of making the block for my mystery block of the month quilt and I’m making these blocks into quilts of their own. And this block has relatively few pieces compared to last month’s vintage star block, and was therefore much easier to put together, phew.

The part that required the most concentration was not to cut the wrong side of the sewn line, but I managed that successfully each time - and tbh it really wasn’t that hard, but that was the potential stumbling block (no pun intended) this month.

And in no time at all I’d added borders to the hearts, and joined the blocks together.

But I felt it wasn’t quite there yet, so left it overnight mulling over which fabrics to use for the borders. In the end I decided on a thinner red checked border before adding more of the multi-patterned pink material from the old duvet cover. I think it needed the bold checked thin border to make it work. I also knew that it needed the stripes to match as best they could to avoid it looking messy.

And with a little bit of luck that worked out.

I’ve also changed my mind on which backing to use, originally I thought it would be the multi-patterned pink fabric but I think any more of that would be too much, and so I’ve opted to cut up a paler pink single duvet cover which I bought a couple of years ago on eBay for £1.04 plus postage - as I discovered in the label I’d thoughtfully written for myself when I unfurled the fabric.

Finishing the quilt

I got the quilt to a finished quilt top level in a few days, then it sat for a while waiting for me to assemble it with the batting and backing fabric. In fact I snuck that part in ahead of waiting for family to arrive over Easter, which was a good use of time. Then after the bank holiday I set about quilting it. Remembering that the purpose of these quilts is partly to up my skill levels and to get myself comfortable with both piecing and quilting, as with practice comes a better crafter.

So rather than quilt this one as I have before I decided to quilt it in diagonal rows across the quilt, and then spent ages looking for some masking tape that I was sure I had,. I didn’t find that, but I did find some tape with marked lines on which was probably a better option, or it was once I worked out where to place it most effectively, and so I didn’t sew over it!

I also wanted to change the density of the quilting on the hearts. I considered a different colour thread, but in the end opted to add quilting lines closer together, using the same approach.

And I’m happy with how this quilting style turned out; the tape worked well and could be easily repositioned for each line of sewing. I didn’t have a plan for the spacing between the lines before I started and worked that out as soon as I started to plan the second line - they’re about 8.5cm apart. Yes they could be more precise, and ideally closer together but it was good to discover this process as I went.

The finished quilt this time with the bottom right hand corner turned back on itself to show the bagain backing fabric

It turned out well didn’t it? And four hearts and a hug seems the perfect title for this one.

You can see my other quilts which I’ve made to donate to Project Linus - a charity whose mission is to provide love, a sense of security, warmth and comfort to children, who are sick, disabled, disadvantaged or distressed through the donation of new, homemade, washable quilts and blankets, including those that are part of this ‘stretch’ project in earlier posts. I’m aiming to publish an update on my progress in the last week of each month for the remainder of 2025.