Getting hooked on weaving with waste

Earlier in the year I tried to book on a workshop with Sarah Cooke, but unfortunately I’d discovered it too late and it didn’t go ahead as there weren’t the numbers for it to be viable, which was a shame. I hoped there might be another date at some point, but didn’t really think any more of it until one morning on our recent holiday when I saw it advertised in my sewing group’s facebook group. I couldn’t believe my luck and manically emailed the organiser to secure my place. What’s more, this newer date was much closer than the previous one, so it was a real bonus for me.

And so I turned up not quite sure what to expect, and not really sure I was going either - but that happens a lot as I’m continually discovering new places by attending workshops or exercise classes!

Sarah started the day by showing some of her makes, which you’d never guess what they’re made of. Clue - it’s all waste products, and for these two that I’m sharing here, they’re most likely food products we have in our freezers and in our store cupboards.

A multi-coloured striped weaved bag made from crisp packets by Sarah Cooke

A striped weaving by Sarah Cooke made from Sensations crisp packets

A green and yellow striped weaved bag made from frozen peas and frozen sweetcorn bags - by Sarah Cooke

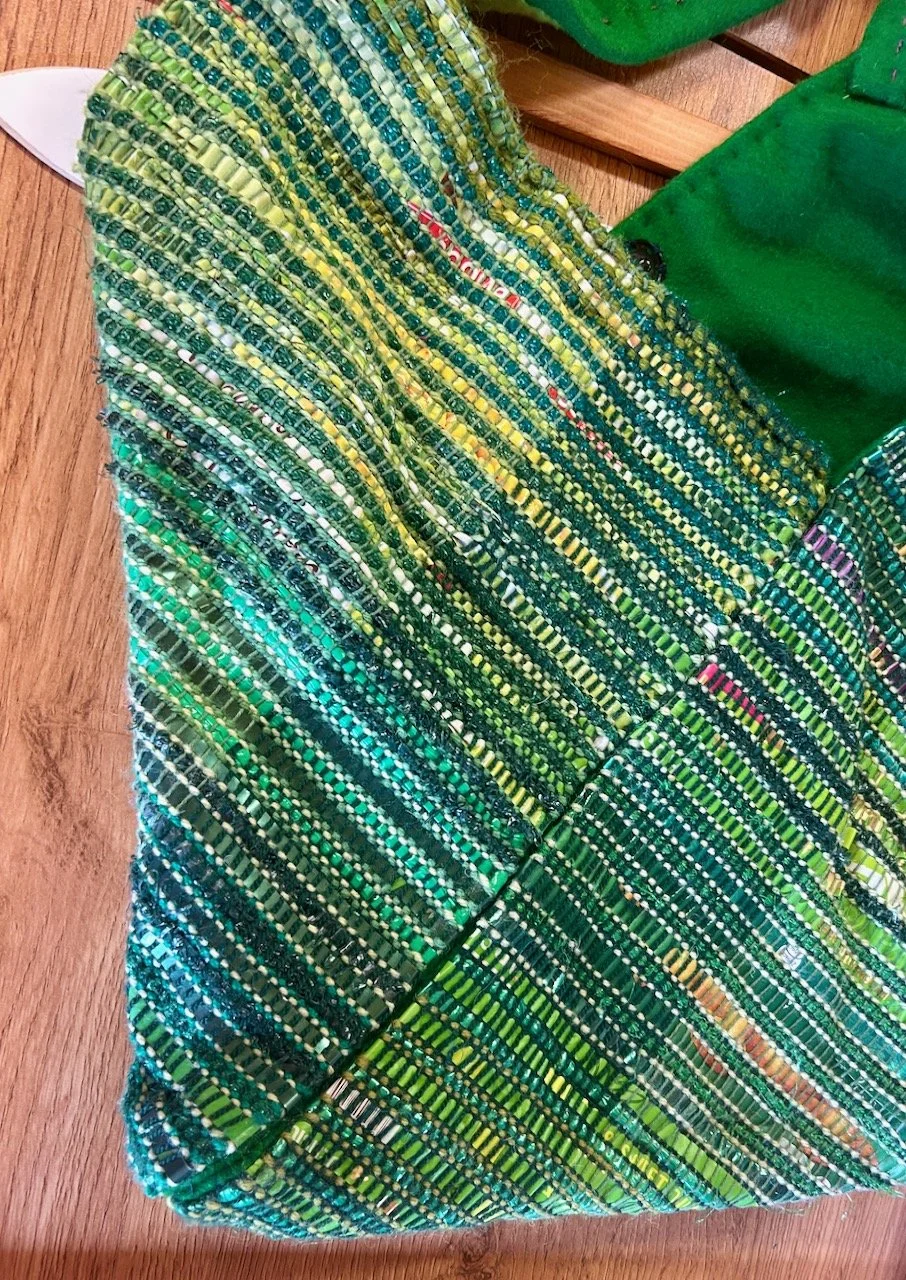
A green and yellow striped bag by Sarah Cooke made from bags of frozen peas and frozen sweetcorn

So the two examples above use (clean) crisp packets and frozen vegetable bags, and you wouldn’t think to use them would you? But Sarah did and they are amazing, they’re also both really soft which I didn’t expect either. If you look at the pictures closely now you know what they’re made from you can see some of the text remains and almost gives it away.

Now you can see why I was so captivated, and inspired can’t you?

Sarah brought plenty of ‘waste’ for the group to use throughout the day, and there were things you’d expect like wool, ribbons, trimmings and material scraps, as well as things you’d probably not expect. For me the revelation were those plastic string bags that lemons, oranges and other fruit come in - they’re amazing to use, as well as old hi-vis jackets, plastic metallic streamers, oh and so much more.

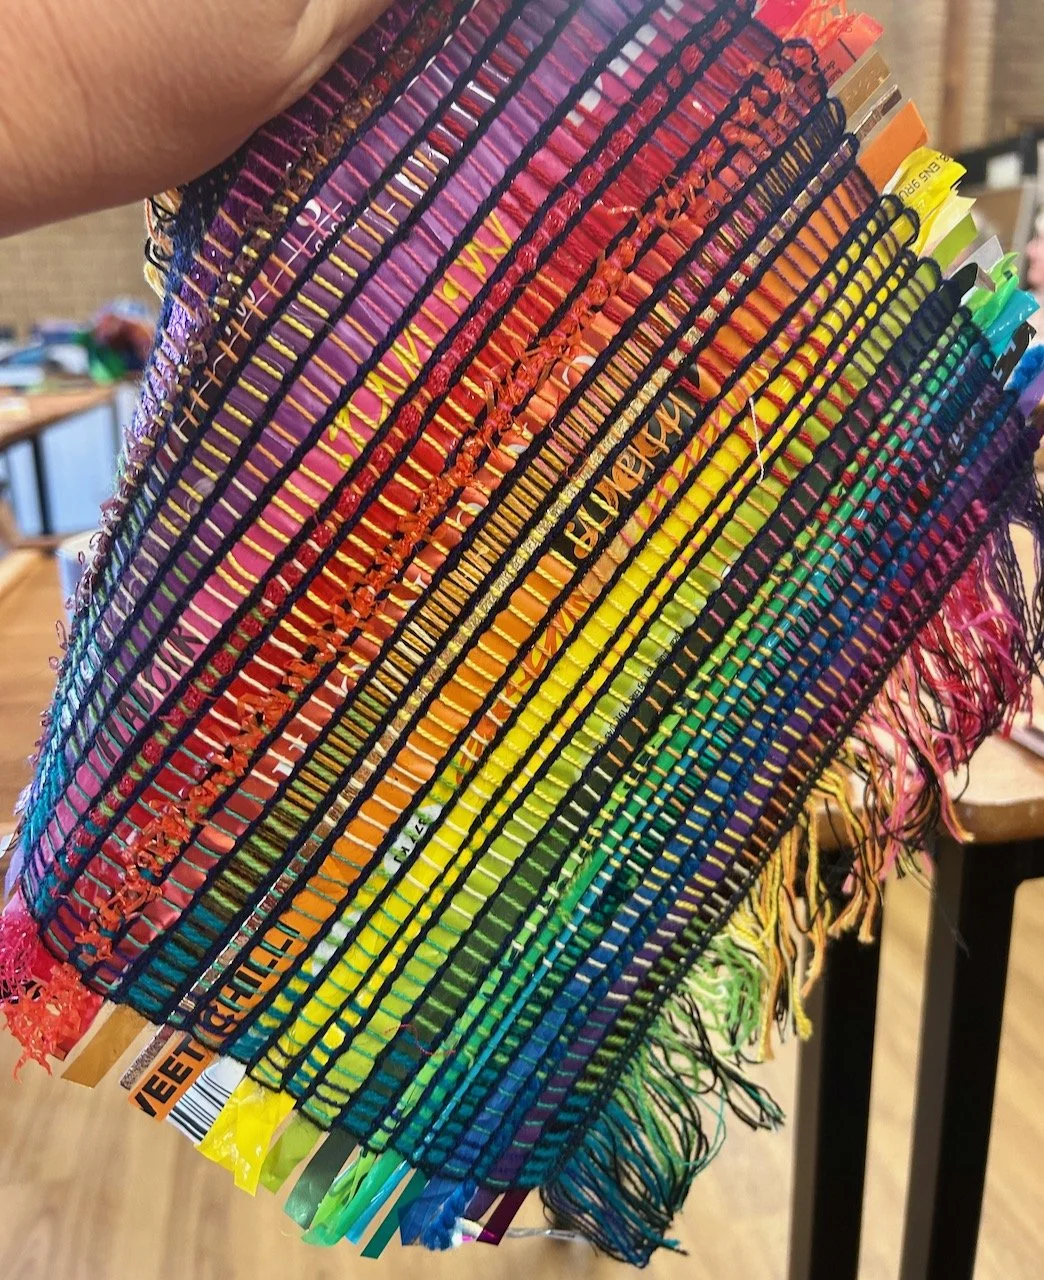
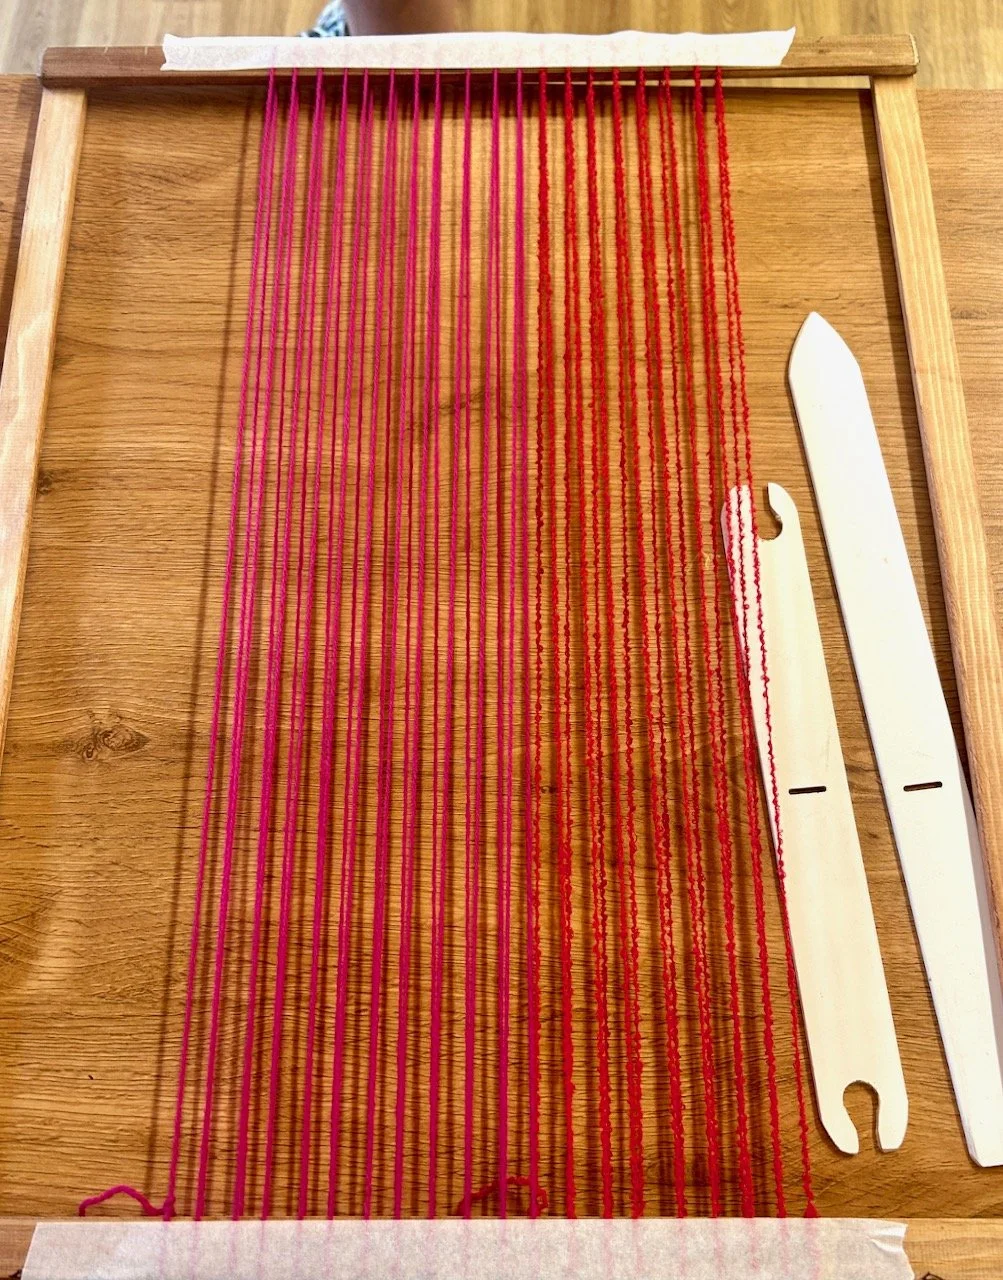
We started by adding our warp to the frame - I opted for a cerise and a boucle red, and you’ll see these intermittently in my weaving. I should say that this is my first time weaving and while I’d love for my outputs to be as good as Sarah’s, I know I’ve a way to go and for me the day was about trying things out.

But it didn’t surprise me that when confronted by the tables of stuff I headed to my default colour scheme of pink, red, orange and yellow with a few variations.

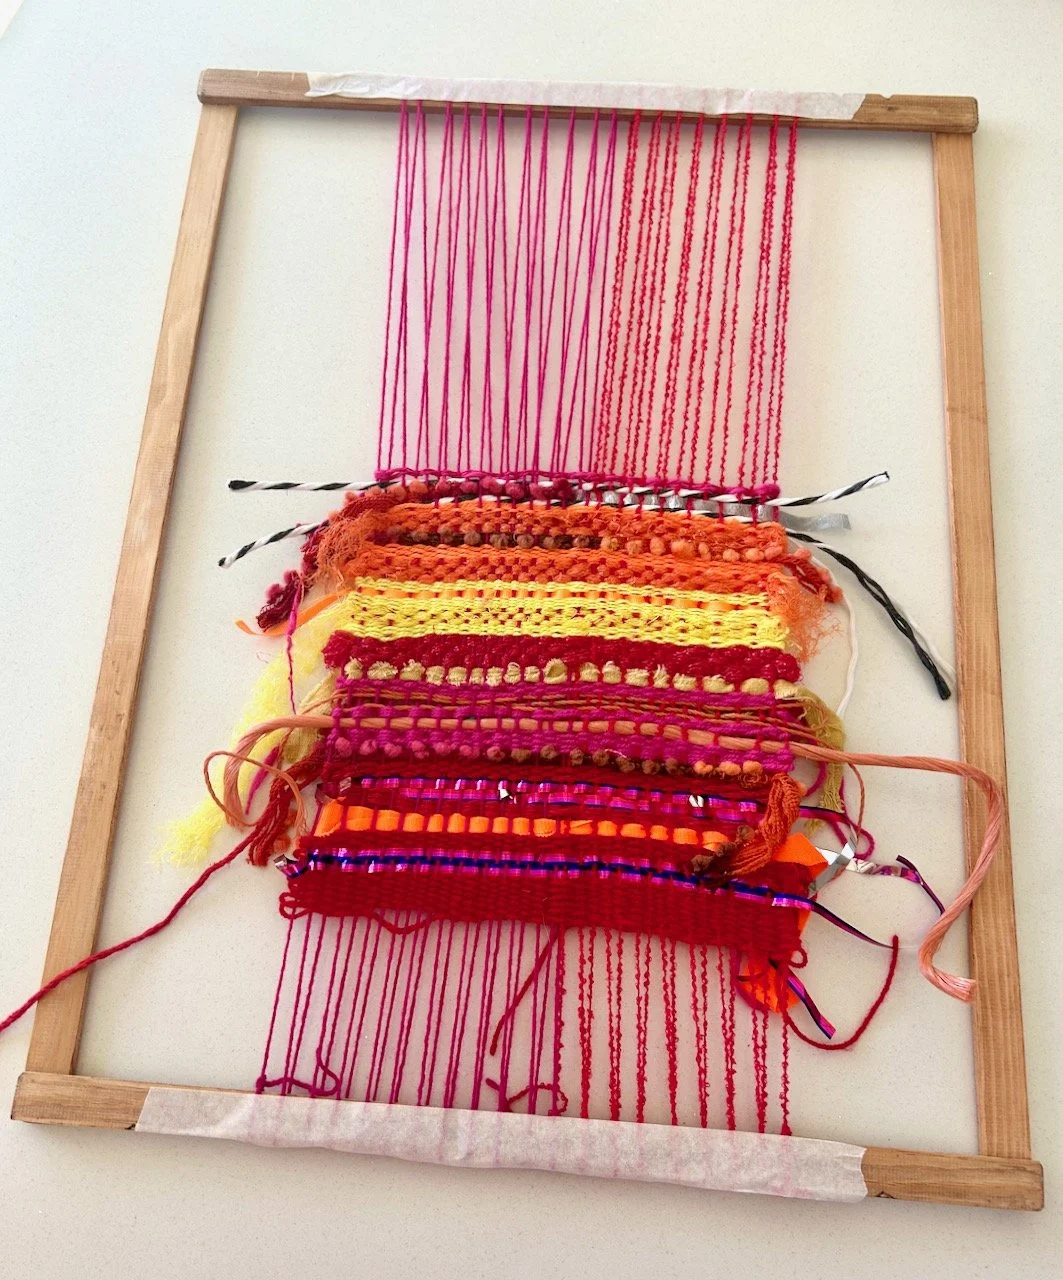
From the bottom I’ve used: wool, plastic metallic streamer, more wool, a strip of orange hi-vis clothing, more wool, more plastic metallic streamers, more wool, a bobble trim with the bobbles poking out to the front, wool, plastic rope, wool, plastic twine (this isn’t as closely woven), wool, a material scrap, red mesh bags, wool, yellow mesh bags, wool, more hi-vis material, wool, orange mesh bags, wool, bobble trimming, orange mesh bag, wool, black and white plastic rope, a split row of the bobble trimming and a flat metallic plastic strip, black and white plastic rope and wool.

Mine grew pretty quickly on the day, and while wall hangings are nice they aren’t me. So my plan is heading more towards a placemat for our garden table. That said though I do like the effect of it on the frame against our white walls and MOH is going to put some hooks up in my craft room so I can enjoy it as transient art while it’s ‘in progress’.

It has grown a little since the workshop too, but there’s a little further for it to go yet.

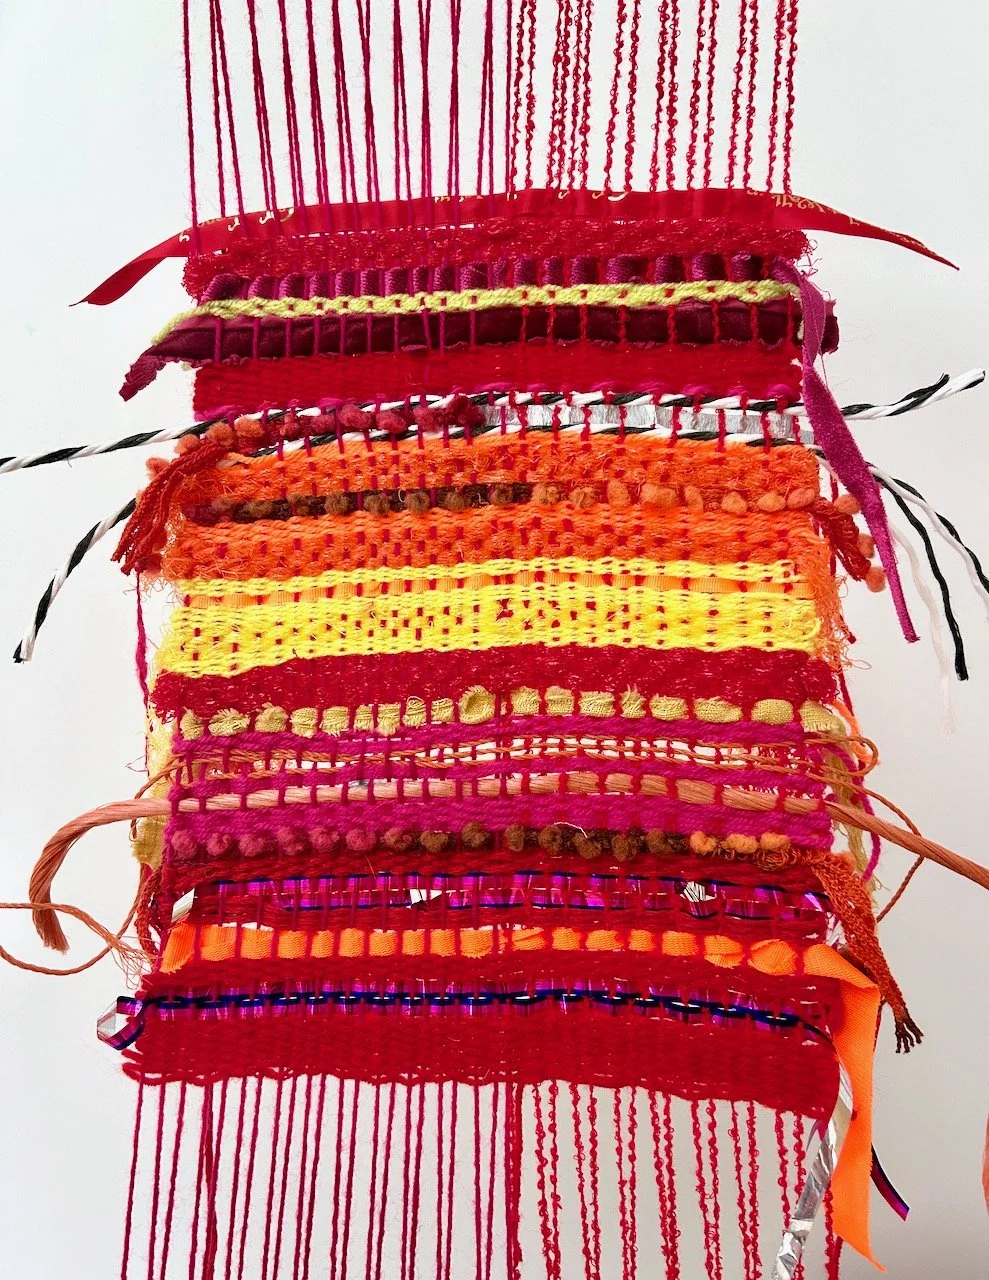
Since the workshop I’ve added: wool, a velvet trim I’d kept from a t-shirt, wool, a velour strip, a red mesh bag and a ribbon from chocolates.

In the weft rows I’ve added since the workshop the velvet trimming and chocolate ribbon have come from my own stash - and I’ve plenty more that I could use. In fact I came home from the workshop so inspired I was immediately off to look out that velvet trimming which I’d kept for I didn’t know what until then. I’ve also found some plastic present wrapping ribbon which I’ve never used but fell in love with years ago at Ikea - these will feature in a future attempt.

I also have plenty of ribbons, and scraps of materials and edgings which I’ve known ‘will be useful one day’ and the great thing is their day is coming, well when I find the time. I didn’t really know I needed a new craft, but I’m happy I’ve found it!

I’m also commissioning MOH to make me a smaller sized frame, so that I can make smaller pieces and potentially use some of the crochet threads I’ve acquired over the years, but first on my list is to finish this one and to make complementary (and not necessarily matching) table mats to use.

Watch this space.

Pleated Tulips

I’ve updated the final section of this post now that the quilt is fully complete, after a final push to baste, quilt and bind it this weekend.

I’ve made another quilt as part of my quilting ‘stretch’ project this time using the block from Sherri at A Quilting Life’s mystery block a month. As I said then I don’t know if I’ll manage to make a quilt a month, but I won’t really know unless I try…

And as I said in my recent Quilty Update I’ve realised that this stretch project is dominating my sewing, so I need to work out how to change that so I stand a chance of achieving more of the quilts and other projects on my list. Small steps and all that, but as you’ll have seen I’ve finally made myself a dress, so there’s some hope!

I’m trying not to beat myself up too much for not finishing another quilt, even though I gave myself a bit longer to do this one since we returned from our trip. I’m looking at the positives, which are that given I started this one less than a week ago, it’s already at this stage with only the final steps to complete. And if you say the final steps of baste, quilt and bind quickly, then it really isn’t very much at all!

My seventh charity quilt

Last month I intended to include much more yellow in my Friendly Bee quilt, but when I pulled the materials from my stash it didn’t work out that way, so this month I was more determined. And more successful!

The materials I’ve used in this quilt are parts of four different fat quarters, along with some plain yellow strips from an old netball skirt for the flowers, and some white/gold material as the background and first border which was left over from the backing of last month’s quilt. The pleated yellow border is also from an old netball skirt, which also explains the name. The aztec patterned material is an old duvet cover, and the grey which I’ll explain later was also from an old duvet cover, which I used to back my first charity quilt with Flying Geese. Nothing goes to waste here!

Cutting out the pieces for the centre blocks one sunny evening - still warm work

Once I’d drawn lines and pinned the HSTs (half square triangles) in place, it started to make more sense - well perhaps to me at this stage anyway.

Lines drawn and pinned in place to make the (longer) HSTs

Quite quickly four flowers emerged.

The four centre blocks sewn - and four tulips emerge

I was mildly irritated with myself as I hadn’t managed to match very many of my seams - but as we know, these are test blocks for my Mystery Block of the Month quilt, so at least I knew where I should focus my attention when it came to making that.

I added borders merrily, enjoying getting back to using my machine. This time I used the same material for all of the borders, mostly because I was that intent on having a cheery yellow quilt I wanted nothing to set me off track.

It was only when I laid the blocks out that I saw the nearly matching of the zig zags, which wasn’t my intention. It was close enough that it would look like I’d tried to pattern match, and failed - and I knew it would be distracting to my eye at least. But I also knew I wasn’t going to unpick them and try to get them to match.

Four blocks edged in white/gold, then pleated yellow and a grey, white and yellow aztec print - laid out in formation

So my plan was to add plain sashing to help distract my eyes - and I think it works. Phew.

Trying out some plain grey sashing between the four blocks
The grey sashing sewn in place, and a border added around the whole quilt top using the same material

So there it is, my seventh finished charity quilt top waiting to be finished off which I’m hoping will be relatively soon. My plan is to use the grey, white and yellow aztec print on the back of the quilt and to use that as the binding too, but there’s a couple of steps before I get to the binding.

Finishing the quilt: Update

It is done, and I’m happy with how it turned out. Once again I’ve quilted using horizontal lines, and this is quickly becoming my favourite style. It’s something I saw and liked at the Newark Quilt Show, so I’m pleased it’s working out well for me too.

Unusually I decided against adding a scrappy border, as I’ve done with each of my charity quilts until now. For me this one needed more of the yellow and grey Aztec print, and that’s what it got.

The binding wasn’t without issue though. I opted to use a yellow thread, which my machine only liked in short lengths - thankfully I hadn’t thought to quilt the whole thing in yellow - although I can tell you if I had I’d have adopted a new plan pretty quickly! But lesson learned, and that thread is put away for predominantly non-sewing use (don’t ask, as I’m not sure myself what that is!)

You can see my other quilts which I’ve made to donate to Project Linus - a charity whose mission is to provide love, a sense of security, warmth and comfort to children, who are sick, disabled, disadvantaged or distressed through the donation of new, homemade, washable quilts and blankets, including those that are part of this ‘stretch’ project in earlier posts. I’m aiming to publish an update on my progress in the last week of each month for the remainder of 2025.

In the heart of the Forest

After heading into the Forest with a dodgy ankle and resting it overnight, today’s walk was a circular 14.4km walk to explore the forest. Predicted to take 4 hours 30 minutes, which both of us knew would be optimistic, even at best.

I’d debated with myself if it made sense to do the walk, but as the notes said that the walk would immerse us into everything the forest had to offer I was keen to see what it had in store for us. It also looked as if the walk was a large figure of eight so, if my ankle was playing up there was an option for us to cut it short as tomorrow was a ‘move on’ day and so I needed to be able to do that.

So off we set.

We took a picnic from the hotel and headed back the way we’d arrived yesterday, this time though taking in more of our surroundings, including these peculiarly ‘ribbed’ trees, but still looking out for the signs to ‘Laghetto’ - or small lake or pond.

Our walking notes told us that the Foresta Umbra is devoid of watercourses due to its karst nature, meaning that the topography is formed from the dissolution of soluble carbonate rocks such as limestone and dolomite.

Collections of rainwater form though, and they were fundamental for the development of settlements in the past, and still used as a key resource for animals living in the forest today. The largest of these is Laghetto d’Umbra with a depth of a couple of metres occupying the central part of a large sinkhole and the home to carp, the common toad as well as non-native species such as the golden carp, the catfish and the red-eared pond turtle.

Having spent some time at the lake we headed off for our next destination, the temporary waterhole ‘Cutino d’Orti’ but more on that when we get there, as it was truly amazing and like nothing I’ve ever seen before so I was so glad we opted to do the walk.

But we had plenty of forest and forest paths to navigate before we got there, and many directional markings to admire - thankfully today, we were following well signed footpaths.

These views of paths flanked by trees never get old, even looking back at my photos as I write this post I can feel the cool calmness that they exude, which was great then experiencing first hand and also very welcome today as the temperatures have notched up again here.

There were glimpses of sunlight coming through the tree canopy too - whether it was right down to the forest floor or just caught in the leaves, it’s no wonder that we find forests captivating.

We approached the clearing with the temporary waterhole ‘Cutino d’Otri’ and we couldn’t quite believe what we were seeing. We knew to expect a circular shape, bordered by an ancient dry stone wall with two gaps, or passages, which allow wild animals to drink without being trapped in its stagnant waters.

But we didn’t expect this.

It was stunning. The colour especially so.

And mesmerising. We watched the small insects dart about the surface, a toad appear every now and then and make a tremendous racket and unknown creatures below the surface. We even saw a small turtle crawl out of the water to enjoy the sun.

Totally amazing, and not something to miss - even to rest a dodgy ankle.

Eventually we drew ourselves away and headed into another part of the forest, this time to Falascone a further protected segment and a rare example of mixed beech forest. It was as amazing as the rest of the forest, but by now I was keen to get back and rest my ankle as I knew tomorrow’s walk could be more challenging. It was short, just 8.6km but it was the total ascent of 485m and a total descent of 315m that was playing on my mind!

I was momentarily distracted though by spotting a Granny’s Bonnet, and then lots of lichen!

And then there was the road back to our hotel, which was almost as picturesque as being in the heart of the forest. Almost.

See all of my posts from our self-guided walking holiday in the Gargano Peninsular. We started the walk on 18 May 2024, returning to the UK eight days later.