Creating plaids with gelli plate printing

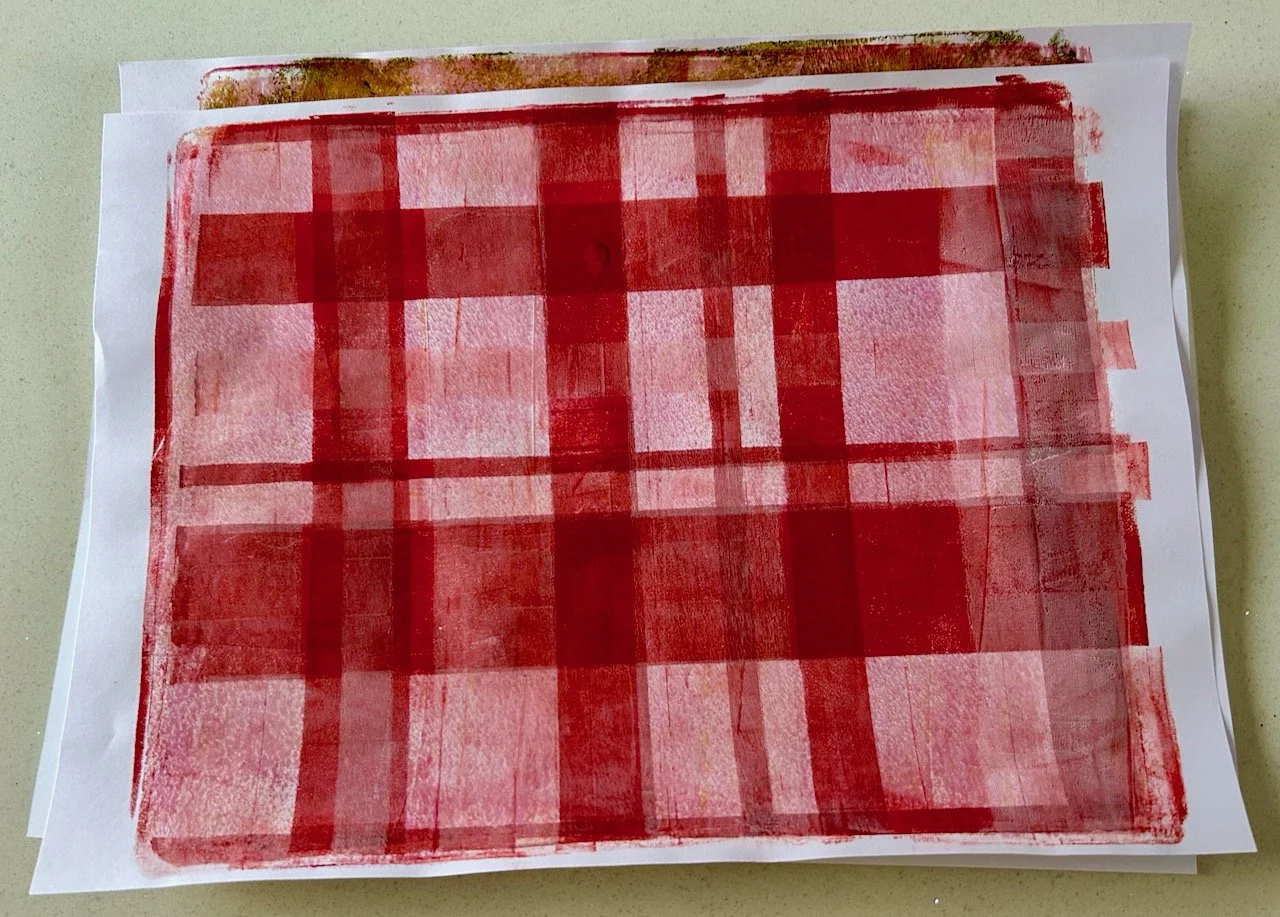
In my previous post on learning to gelli print I shared how to print using stencils and shapes. Today I’m sharing how to create plaids, which I think is one of my favourite approaches so far. As with gelli plate printing generally, it’s quite random - so if you’re a perfectionist or like things measured exactly this may not be the craft for you. However, if you’re happy to go with the flow and see how things turn out, then I think you’ll love it.

I ended up with three plaid designs from the class which I’m sharing here, but this is something I will try again as it’s great to see how it’s going to turn out.

To create plaids you need more paper

It’s simple really, but you need to cut lengths of paper in the width you want, or varying widths to create your horizontal and vertical stripes. First you work the ‘stripes’ one way, and then the other, laying them on the gelli plate and working quickly as is the gelli printing way, so that your thin layer of paint doesn’t dry on the plate.

The results can be pretty spectacular, and you can reuse the extra strips of paper as many times as you need to to get the design you’re after. And even when that’s done, the strips of paper will be covered in their own unique colours and can be used for example in card making - the possibilities are endless.

Red and pink plaid created with gelli plate printing

Though that’s the danger I’ve found with gelli plate printing - I’m keeping more and more pieces with the view that I could use those ‘one day’ - a bit like you do, or well I do anyway, when cutting out fabric. And how small is too small, well one thing’s for sure and I think they’re probably different sizes for fabric and paper, just don’t get me to commit to what that is for either of them!

Experimenting with colours

You only have to Google ‘colour wheel’ to discover the theories and relationships between colour, and how you can use primary, secondary and tertiary colours, and I’m not about to explain that here, you’ll be pleased to know. But after trying the complementary colours above, I wanted to try something bolder for my next print - and I think the blue works with the reds and oranges, don’t you?

Orange, red and blue working well (despite how it sounds) for another gelli plate printing plaid

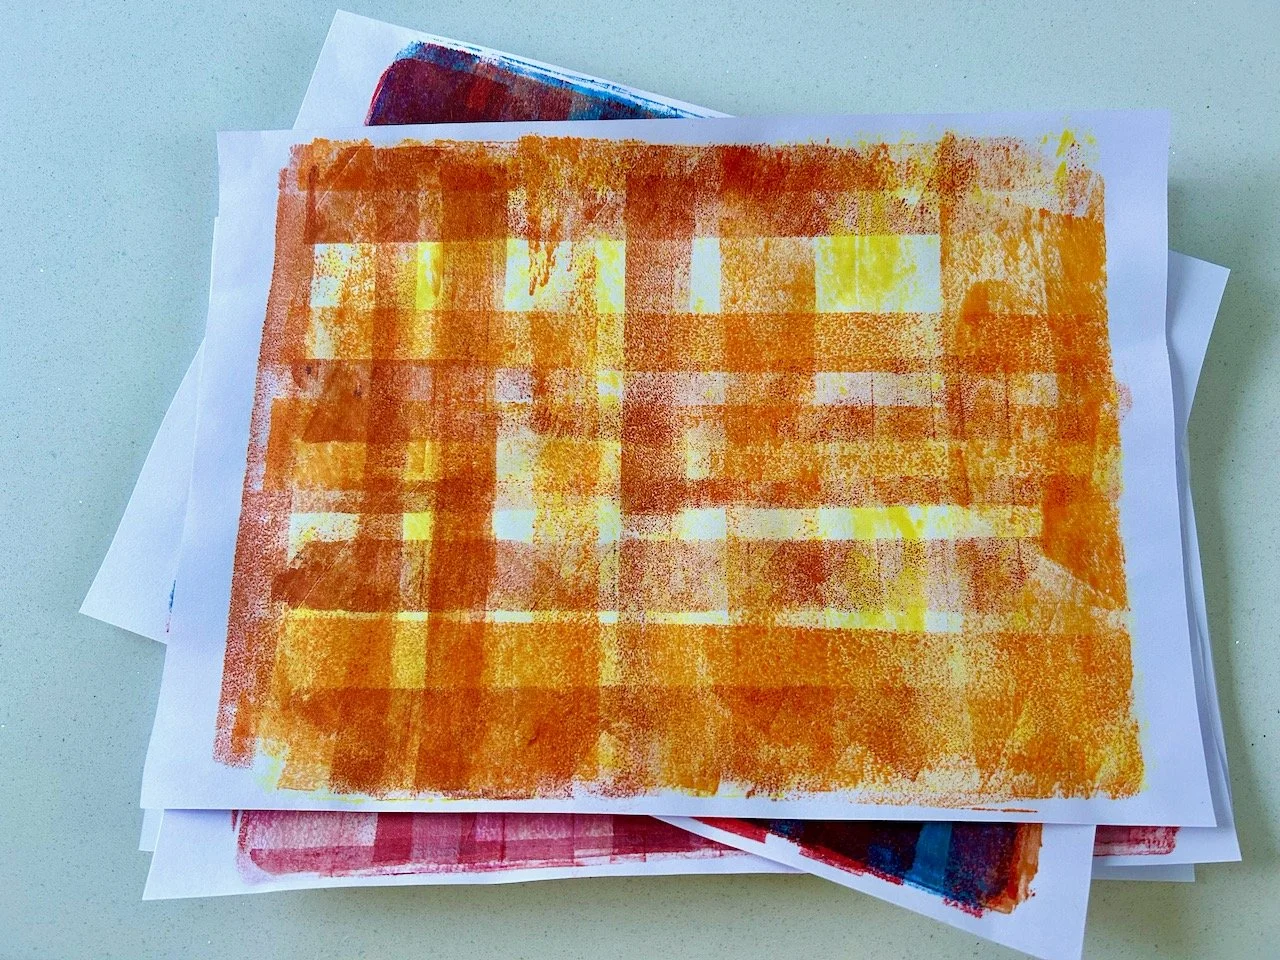
Using up those misprints

This is a great way to use, or reuse those prints which didn’t quite work the first time as you’re printing over the top adding more paint and therefore more interest as you go.

In the image below my starting point was a very patchy yellow print, but by adding vertical and horizontal stripes in reds and oranges I’ve created a pattern that I really like for it’s ‘distressed’ look, and which I know I’ll find plenty of uses for in my paper crafting days ahead.

A more distressed plaid with less full coverage using yellow, orange and rust coloured paint

Here I’ve only scratched the surface of the many, many combinations and patterns this technique can create - but as a taster I think you can see that it’s one that’s intriguing and has the potential for further exploration when I set up my gelli plate at home.

Yes I succumbed and bought my own gelli plate - it was inevitable really wasn’t it?

Book Review: The Ultimate Sewing Machine Mastery by Katie Matthews

* I was sent a copy of The Ultimate Sewing Machine Mastery book by Katie Matthews for the purposes of this review - as usual my views and opinions are very much my own.

Like many people I don’t often think about the mechanics of my sewing machine until I absolutely need to, and by that I mean when something’s gone wrong. Then I dig out the manuals and scratch my head a bit, or sometimes a lot and set about trying to solve whatever’s gone wrong. But actually that’s potentially not the most efficient way is it? If I had a greater understanding of my machine in the first place then perhaps I’d spot an issue early on, and I’m pretty sure I’d get more out of my machine than I do now.

That’s what this book - The Ultimate Sewing Machine Mastery by Katie Matthews - has highlighted for me, and as such having read it it will be kept close to my machine and I’m sure become an essential part of my kit. As much as my pincushion, scrap fabric and scissors, and dare I say it the stitch unpicker - though truth is I keep that close to hand to fend off stitching woes, as I know as soon as I put that away again, I’ll need it and probably won’t remember where I’ve put it.

The book takes a comprehensive look at every aspect of sewing machines - from the evolution of the domestic sewing machine, including that the Science Museum in London displays the first model taken from drawings by Thomas Saint in 1790, and how one Isaac Singer (now there’s a familiar name) patented a machine with a foot treadle for powering the needle in 1851, through to the anatomy of a sewing machine and the all important troubleshooting.

So whether or not you want to learn about your take up lever, tension discs or your stitch selector then it’s worth getting your hands on a copy of this easy to read and informative book. Katie is a sewing machine engineer and owner of K&B Sewing Machines in Hampshire and uses the knowledge and experience gained from helping customers, and her technical insight to “share the joy that comes from a well maintained sewing machine.”

And in case you’re wondering your take up lever helps feed the thread and maintain tension while a stitch forms and is at the top of the front of the machine directly above the needle; your tension dial can be along the top or on the right hand side of your machine and loosens or tightens the upper thread tension and your stitch selector is where you can open up a whole new world of fun, but more on that later.

It’s not just a book for beginners either, as I said at the start of this post not many of us learn the technical side of our machines - we just get on and start sewing, but there’s a lot to be said for knowing what sounds right for your machine. I would class myself as a ‘handy’ sewer - neither beginner, nor experienced. I know my way around a machine, and have used one on and off for a good number of years, I rarely use patterns and if I do I tend to veer off if and when I get an opportunity - though I need to get better at following patterns more closely as I’ve a stack of wearables building up that I really should get started with. For quilts I think there’s more scope to go off piste, for clothes less so - or at least until I’m more experienced at those.

But anyway I was surprised to read that when I’ve finished a sewing session I should leave the needle at its highest point - I checked my machine, it wasn’t - it is now - and was reminded that I should cover my machine to protect it. I rarely do this either, but I should get into the habit as it is a sensible thing to do.

Needles, Thread and Bobbins

There’s whole chapters on needles, thread and bobbins and bobbin cases - all of which are essential, but with the potential for so much to go wrong, and of course go right! And that’s before you even get to the chapter on Tension.

The Needles chapter includes demystifying needle sizes and types, and a tip to test if you’re using the right needle size for your thread, as well as answering the question on how frequently you should change your needle - and it’s more often than you do, I bet!

The Thread chapter explains how to choose the appropriate thread for your sewing machine, how to store it and recommends buying the best thread you can afford, while avoiding old threads as well as threading the machine and the purposes of spool caps and their correct use.

Did you know that if your bobbin is incorrectly wound or unevenly filled that it may cause you to have irregular stitches and tension problems? Katie explains why it’s crucial to use the correct bobbin in your machine - and most importantly the wrong bobbin could damage your machine and that could be frustrating, and costly.

Getting more confident with the Presser Foot Types

This is something that’s on my hit list for this year - I’m quite happy to sew in straight(ish) lines, and to even use the decorative stitches on my machine (I haven’t forgotten I promised more on this later!) but I’m less sure about using different feet. Since I went on the overlocker workshop recently I am more confident in changing the plate on my overlocker (that was a requirement for the fancier rolled and lettuce hems), but I could do with being better changing the feet on my sewing machine.

Though I was partly reassured and partly horrified to read that I’m not alone - approximately 70 percent of people don’t know how to use the specialised presser feet for zips and buttonholes, which I’m pleased to be reassured simplifies these otherwise tricky tasks - it’s definitely time to get braver and take the plunge, rather than continue to choose patterns without zips!

Stitches, straight and otherwise

An explanation of how a stitch is formed and the straight stitch might seem the obvious place to start, but many of us take the former for granted and rely on the latter, sometimes veering into a triple straight stitch or even a zigzag. But our sewing machines can do so much more, even the basic ones - and unless we ‘play and learn’ we’ll never get outside of our comfort zone, and it’s really worth doing, and doing more if you do some already.

I know that I’m a practical learner so I got more comfortable using decorative stitches by attending a workshop to create a rustic barn. The majority of this was done not on my machine but one provided at the class, but I finished the applique and added more detail to the barn door using my machine at home. This project provided the perfect opportunity to test out in a playful way, but learning and building confidence at the same time.

A rustic hessian barn shape on cream backing fabric.  The barn is decorated with appliqued 'windows' and uses decorative stitches to create the barn door and other panelling/decorative touches on the barn

I still love how this turned out, and at the time I was looking for something useful to turn this into - in the end I settled on a cover for my sewing machine but didn’t do too much about that, though the reminder to cover my machine when I’m done may just re-ignite that idea - watch this space!

And mini-projects too

The book also includes a couple of mini-projects, I’m more keen on the one to make a stitch book than the one to reuse thread scraps - which is a surprise really as I like to reuse as much as I can, even pondering what size scrap is too small to keep (still undecided btw), but reusing thread scraps may be a step too far, even for me.

However I agree with Katie that the felt stitch book is a good way to familiarise yourself with the stitches on your machine, and to do it in a way that will be a useful reference for the future - and pretty too. It’s simple really take some plain felt (or material) and sew every stitch your machine has on a separate row - use a single colour, or multiple colours, a rainbow or tones of your favourite colour. Then once you have your pages, sew them along with the cover into your own unique stitch book.

In summary

I got a lot out of this book, and hope to get a lot more out of it going forward. Reading about this from Katie’s view with her experience from the ‘other side of the machine’ it made a lot of sense - a well maintained sewing machine will bring more consistent results and less frustrations, and much more.

I mean, we make sure other machines, such as our cars and domestic heating systems, are looked after and serviced and so it makes sense to do the same for our sewing machine too. Even if that means introducing our own regular cleaning routine, which goes beyond ‘fuffing’ out the fluff when we see it, if our budgets can’t always extend to a regular full service, though I’m sure most sewing machine engineers would advocate a full service wherever you can.

Certainly food for thought, and some new habits for me to adopt.

* With thanks to Katie and her team for providing me a copy of this book for the purposes of this review.

PostCommentLove

Post Comment Love 1 - 3 March

Hello there, and welcome back to this week’s #PoCoLo - a friendly linky which I co-host with Suzanne, where you can link any blog post published in the last week. We know you’ll find some great posts to read, and maybe some new-to-you blogs too, so do pop over and visit some of the posts linked, comment and share some of that love.

Please don’t link up posts which are older as they will be removed from the linky, and if older posts are linked then please don’t feel that it’s necessary to comment on those. If you were here last week it was great to have you along, if you’re new here this week we’re pleased you’ve joined us.

Happy 1 March!

It always amazes me how quickly February goes, even with its extra day this year. March brings with it, hopefully, spring proper - and more time out in the garden, as I said hopefully. I don’t know about you but I could definitely do with an upturn in the weather.

It’s been a relatively quiet week here as I’ve been full of cold and have been trying my utmost to get through it without passing it on to MOH, again hopefully between us we’ve managed that - but it’s meant I haven’t done a huge amount, mostly as having a head feeling like it’s filled with cotton wool hasn’t helped with anything much.

I have been keeping an eye on my daffodils though, they are almost ready to burst into flower, but not quite. And I don’t want to miss them, so I moved them onto the patio so that we don’t have to crank our necks to see them. The ones on the left have been growing alongside our front wall, and I do wonder if that’s why they’re currently so straight or if it’s just because they’re a little behind the others which have been at right angles to them alongside the garage.

You are invited to the Inlinkz link party!

Click here to enter