Trying out some patchwork Flying Geese

Back in January at the Newark Quilt Show I bought a kit to make a quilt, and it’s been on my ‘to make’ list ever since. Shortly after the show I remembered that the kit was for a lap size quilt, which to be honest I don’t have much use for, and so my plan was to ‘collect’ other materials to extend this kit into a quilt that we could use on at least a double bed, and so I’ve been picking up fabrics as I see them, here and there as you do.

I realised though that I probably had enough to be going on with and that it’d probably be a good idea to see what I’d actually got. And so I pulled them all out, and realised that while they ‘went’ with the fabrics in the kit, I actually liked the fabrics I’d collected a lot more than those in the kit.

Oops.

I mean there’s nothing wrong with the fabric that came in the kit, it’s just that (as you’d expect) the ones I’d chosen for myself were much more me, my style and my colours and when they were next to those from the kit they popped, and the ones from the kit felt almost two dimensional.

Clearly another plan was needed. And it was quite an obvious one too - I’d make the kit as it was designed, and use that as a practice for making the Flying Geese blocks which I’d not attempted before. It’d also be a good test to see if I liked this pattern, and could be bothered to do enough of the Flying Geese blocks for a larger quilt.

And this week I got started on those geese.

a flock of flying geese sewn using the chain method part-way through construction in front  of my sewing machine

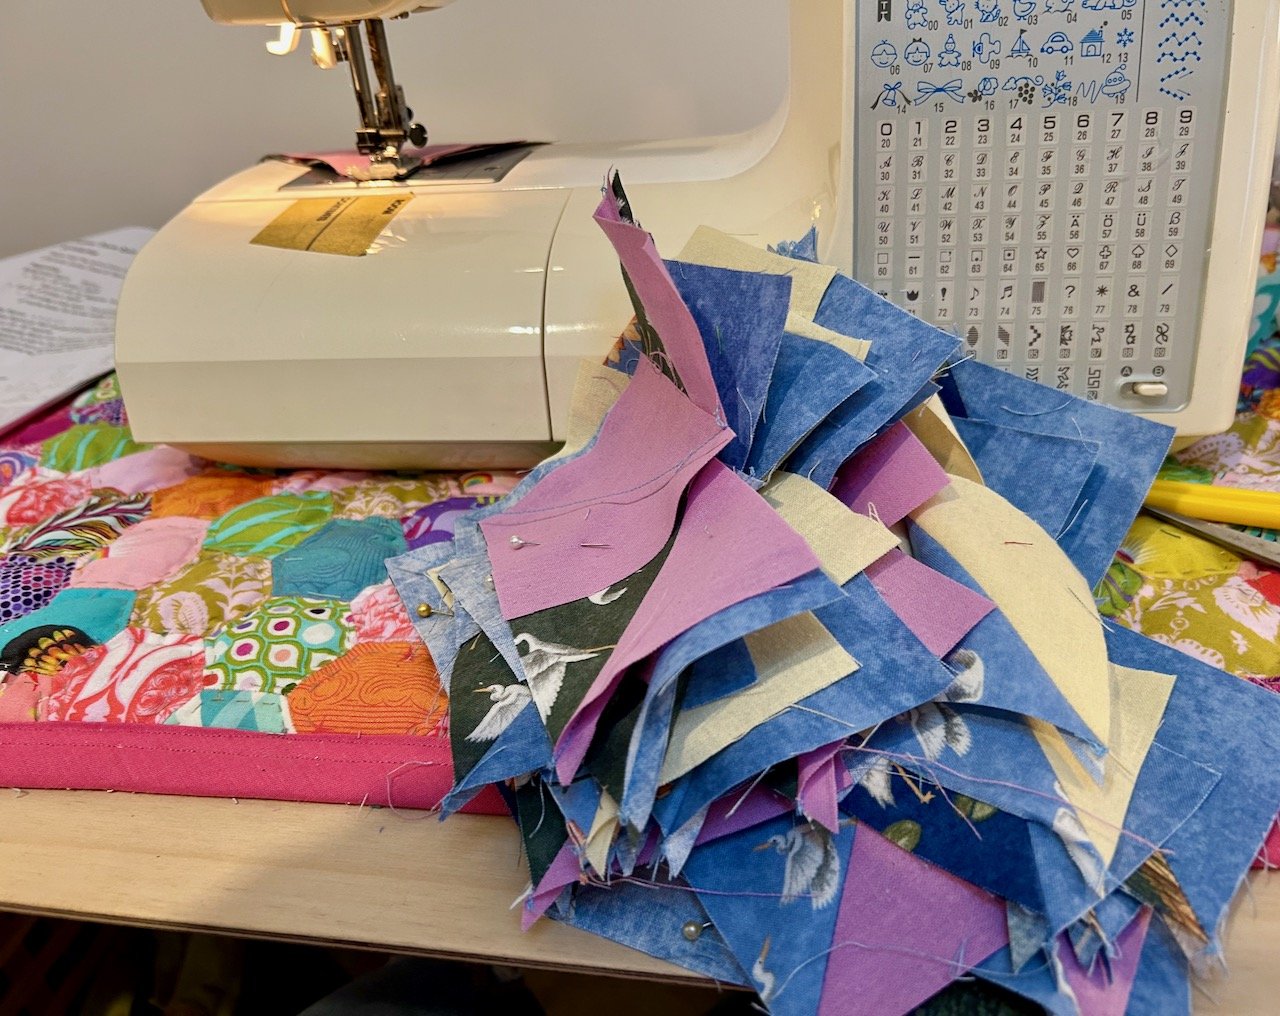
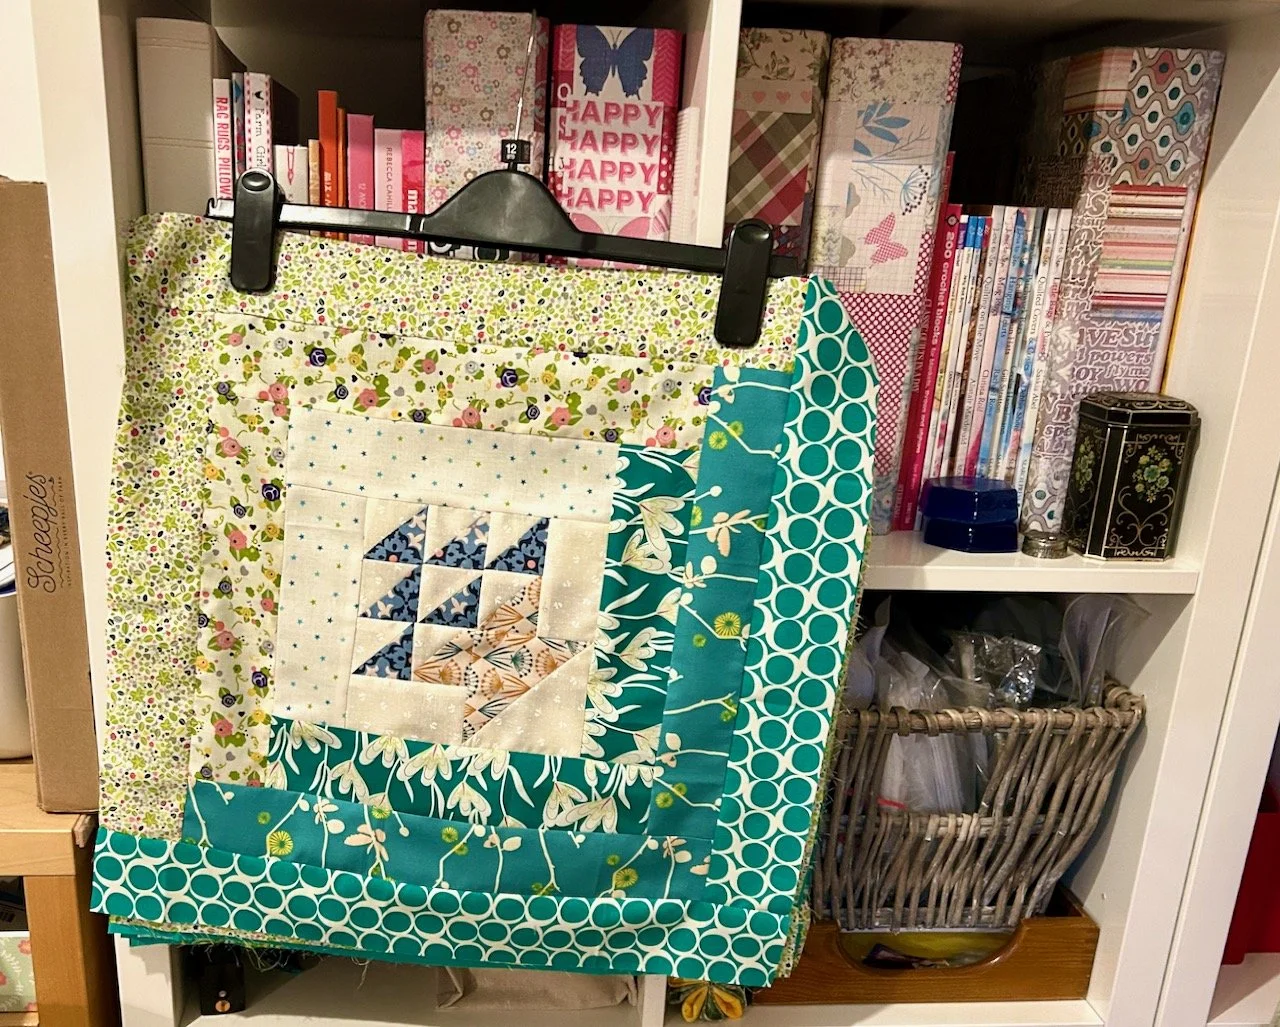
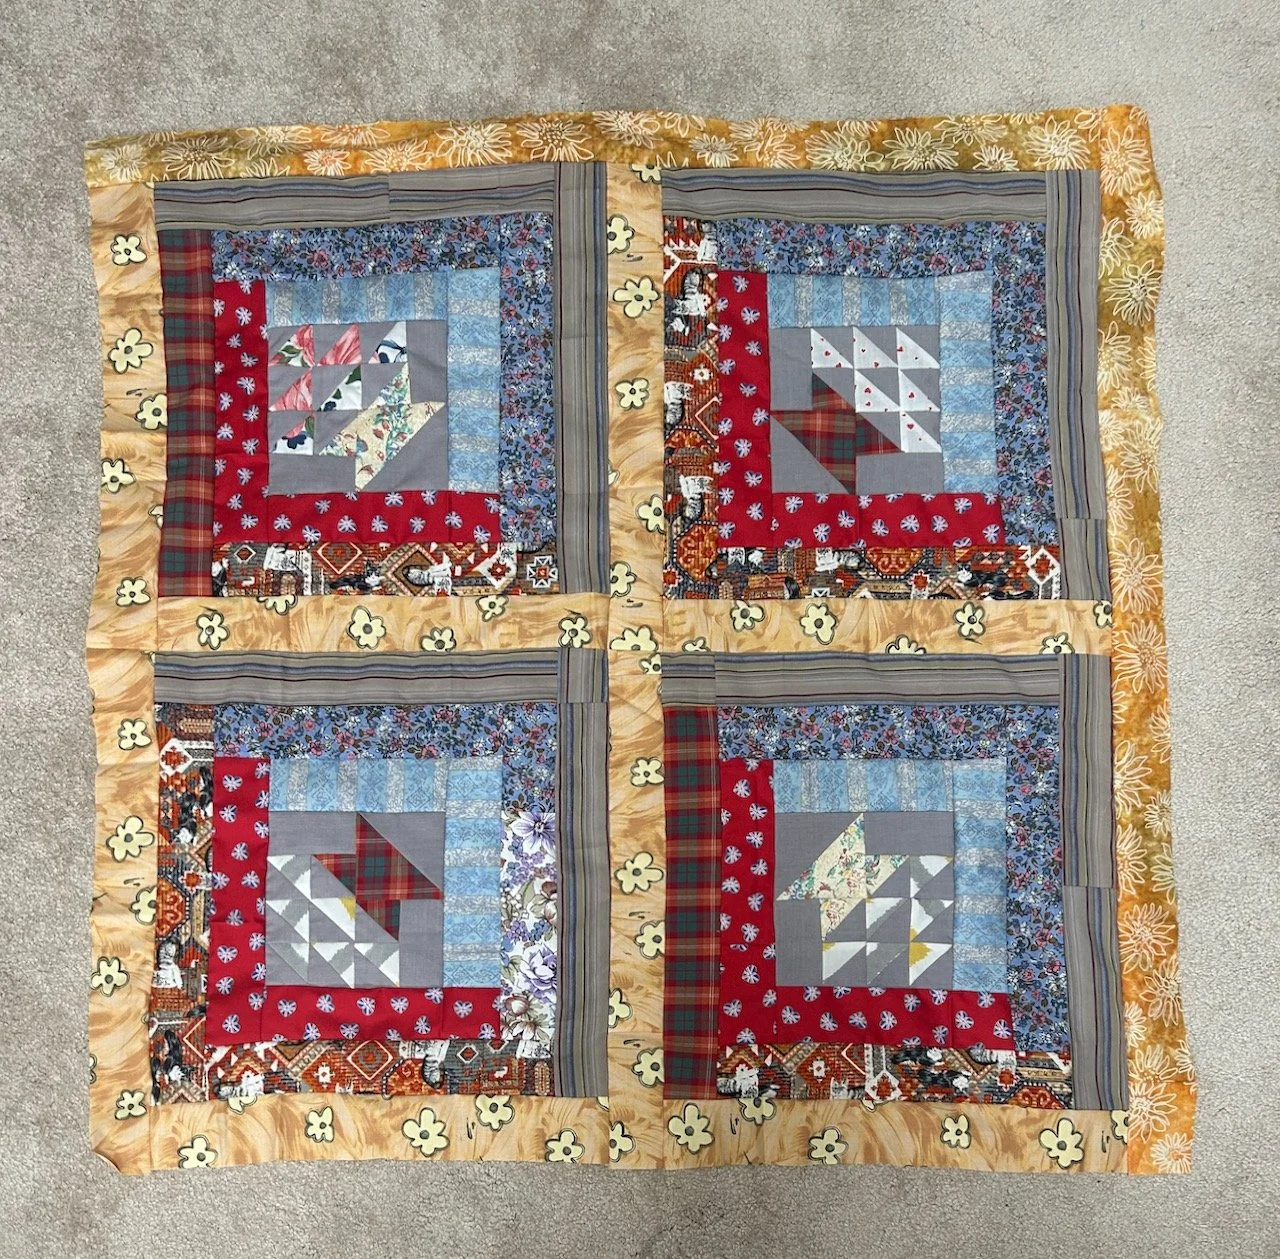
I added the lilac and cream material from my stash, while the mottled blue fabric was part of the kit. I’m not sure its intended purpose was for the geese, but well, it is now. Over a couple of afternoons I made enough of the flying geese blocks to follow the quilt kit instructions - amazingly I made just the right number without too much effort, and without counting too hard. Phew.

The first set I made I whizzed through and was perhaps a bit more cavalier than perhaps quilters are by nature. I didn’t iron my seams, or trim my blocks as I was keen to see how they worked out, and where my ‘points’ were. They worked out just fine, though I can see the advantage of taking it a bit slower, and so for the second larger batch of blocks that’s exactly what I did. The end result is pretty much the same though, but I think assembling the second batch with the other squares will probably be easier, and so it’s probably worth the extra time.

I used the ‘no waste’ method of creating the blocks and was pleased with how that went - it’s much less confusing in practice than the written instructions led me to believe - and I lost none of my points in any of the blocks, so that’s something.

I was surprised at how quickly they came together, and after just three (part) afternoons I was able to start playing about with the layout - this is just one of the iterations.

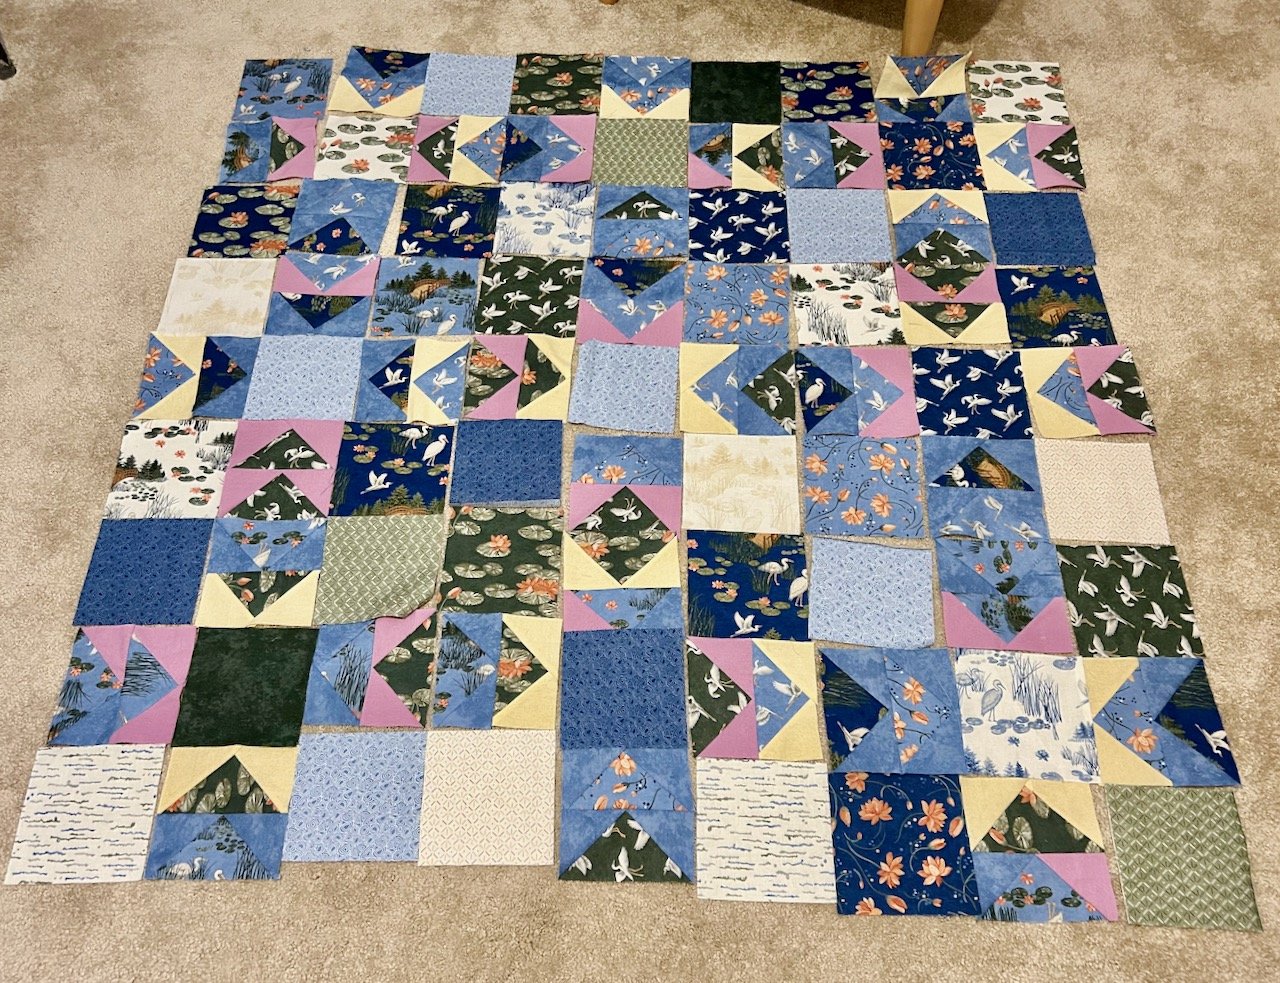
It’s not too bad is it, so that’s my challenge for the next few weeks - to complete this smaller size quilt top, and to dig out some suitable material for the backing. In my head, I’m remembering an old grey duvet cover which will work just fine. I just need to remember where I put it!

And then to reevaluate if more flying geese are on my horizon, or not.

A stack of vinyl pouches

You’ll know that I did a bag making course earlier in the year, and I even completed the pouch that I hadn’t quite finished before our holiday. I wanted to get more confident with zips, and since then have gone a bit zip crazy, what with those garden cushions I’ve shared recently, and now this stack of little pouches.

It started with a kit I picked up a while back after seeing them online and deciding I couldn’t live without them. Before the bag making course I sat down to tackle it but got stuck at the first tip, which was to put the interfacing on the whole fat quarter before cutting out - but there was more fat quarter than I needed for the little pouch, and much more than the amount of interfacing included. The other tips for sewing the vinyl put me off too - it recommended using tissue paper, which makes a lot of sense - and a zipper foot. Neither of which I used making these - so the course has been a success as it’s given me the knowledge and confidence to follow what I’ve learnt in practice.

But anyway, they are rather cute - I made the small and mini versions from some of the materials provided in the pack, which are probably ones I wouldn’t have chosen myself, but I like nonetheless.

Following the instructions, and using the materials provided in the kit I ended up with a small vinyl pouch which I’m very pleased with - and definitely benefited from having the experience of a tutor-led session previously, even though it wasn’t for this exact item as there was lots that could be applied to this pouch.

I realised after I’d finished that while I’d used the fleece lining on the pocket’s lining (the insect fabric) I hadn’t used the thinner interfacing anywhere, and it probably would have benefited from it, at least on the strip below the zip.

I decided to have another go and make a mini version - that one didn’t go quite so well, but it does have the interfacing below the zip. I added some ribbon embellishments to the sides as afterwards I worked out that I’d attached the backing piece the wrong way round - doh! I was pleased to find the zigzag strip in my stash as it covers a stitching mishap - but you wouldn’t have known that if I hadn’t told you.

Even at this stage I could see how useful they would be, both for crafts and elsewhere. But I didn’t want to leave it there on my ‘embellished’ version, as I was sure I could master this little pouch, and I’d also been saving some red-checked vinyl which had (strangely) come as packing, all scrunched up between bottles, and I was keen to see if that would work.

Turns out it did, and I’ve now made ten of these pouches, learning and adapting as I’ve gone along - and I’ve got a stack of pretty pouches too!

PostCommentLove

Repurposing a cycling top

Over the winter MOH spent some time creating a workout space in the garage, as let’s face it not many of us put our cars in there these days and there’s no longer a gym or such like on our doorstep. There’s still space for all our junk (though there’s getting less and less of that as we continue to sort through our moving boxes), the usual paraphernalia and my greenhouse station, so all’s good.

We’ve spent the summer using the space and it’s been really good to have - I already know we’ll appreciate it even more in the winter months - but it is kind of, well functional. There’s some finishing touches that I want to add and I’m hoping to get to more of those soon.

We’ve also finally had our large inbuilt wardrobes kitted out so we can make the most of the space we have (more on those another day!) and so we’ve been sorting through our clothes; some have headed to the charity shop and others are for sale on eBay and Vinted (with many more to list!) and some I’ve kept to reuse. One of MOH’s first cycling tops was in the reuse pile, along with one of his now holey Superdry t-shirts.

In our workout space we knew that storage was going to be key, and we’ve hooks of all shapes and sizes to add to the walls (when we decide where things need to go) but sometimes you just want to shove stuff out of sight don’t you? And away from the spiders (or as much as we can, anyway).

And so the idea for a drawstring bag was born.

A pile of fabrics from a cycling top, and old t-shirt and elastic from the top of some old cycling shorts ready to be repurposed

Having looked for an easy tutorial on YouTube I set about creating the front and backs using the purple t-shirt as lining. I wanted to keep the cycling top details, so cut off the Altura logos from the parts I wasn’t using and supplemented these with the elastic waistband of some cycling shorts which were heading for the bin.

Rather than start by sewing the bag together, my first job was to piece the logos and elastic to add detail to the front and back of the bag, which I’d used the main body of the cycling top for. It was only then that I could actually make the bag, and it turned out pretty well.

The front of the repurposed cycling top bag, complete with additional logos and reflective strips

THE FRONT, COMPLETE WITH THE CYCLING TOP ZIP IN ITS ORIGINAL PLACE

I kept it simple and kept the zip from the front of the cycling top, though at one point my sewing machine grumbled about that. The front has an additional logo (at right angles) and some of the elastic with poppers on the front, as well as the curved lower edge of the back, complete with the reflective strip.

The back, which is the back of the cycling top has another logo added across the back, and thinking ahead to spider-proof this (you can never be too careful) on this side the waist of the cycling shorts was used to seal the pockets.

THE BACK OF THE BAG USES THE BACK OF THE CYCLING TOP WITH ADDITIONAL LOGOS ADDED AND ELASTIC TRIM SEALING THE POCKETS

AND THE BACK, THE THREE REAR POCKETS HAVE BEEN SEALED WITH THE ELASTIC TRIM

The yellow and white cord I’d kept from carrier bags - you know the duffle bag type - which were no longer used (and in fact had already been recycled long before we moved).

I’d planned to make myself a bag along the same lines, but was undecided about which of my netball kits to use. In the end I found my Adidas gym bag which I used to take to netball matches - I know this because it still had the eight safety pins pinned into in for pinning on those velcro bibs to non-velcro-ed tops - something I’d completely forgotten about!

A pink and white adidas drawstring rucksack from my netballing days

So I’m reusing this one as a starting point, though I’ve a feeling that turning old sports kit into drawstring bags could become a bit of thing - and I’m not sad about that at all!

PostCommentLove