Making Madeleines at A Taste of London with AEG

A couple of weekends ago we headed off to The Festive Edition of A Taste of London, held in partnership with AEG at Tobacco Dock. We'd cycled past the entrance a few times on our Tower Bridge route, but I'd not been in before. MOH had, and I was grateful for his advice to dress warmly, as a lot of Tobacco Dock is actually outside. There were plenty of people there, and things to do to keep warm, as well as some indoor spaces, and as you'd expect plenty to eat.
A taste of London at Tobacco Dock

We were excited to be part of the #TakeTasteFurther cookery sessions in the AEG kitchen. Kathy from Gluts and Gluttony led the session to make madeleines in just thirty minutes. Now not only does that seem a tall order, but as well as making them herself she was directing at least fifteen other pairs of cooks, and she had no idea of their cooking abilities, and to top that we also made a cardamom butterscotch sauce while we had some spare time. Seriously, it was impressive - and so were the results.

Kathy from Gluts and Gluttony leading the cookery class at A Taste of London
A silicone madeleine tray, now that makes perfect sense to me

1. A silicone madeleine tray on our workbench was a big clue for what we were making.

Meanwhile on the mixer I started beating the eggs and sugar the easy way

3. With MOH melting butter, I could get my hands on the AEG freestanding mixer, which I would happily have in my kitchen. Eggs and sugar went in and took no time at all to beat.

Adding the flour mixture to the eggs and sugar

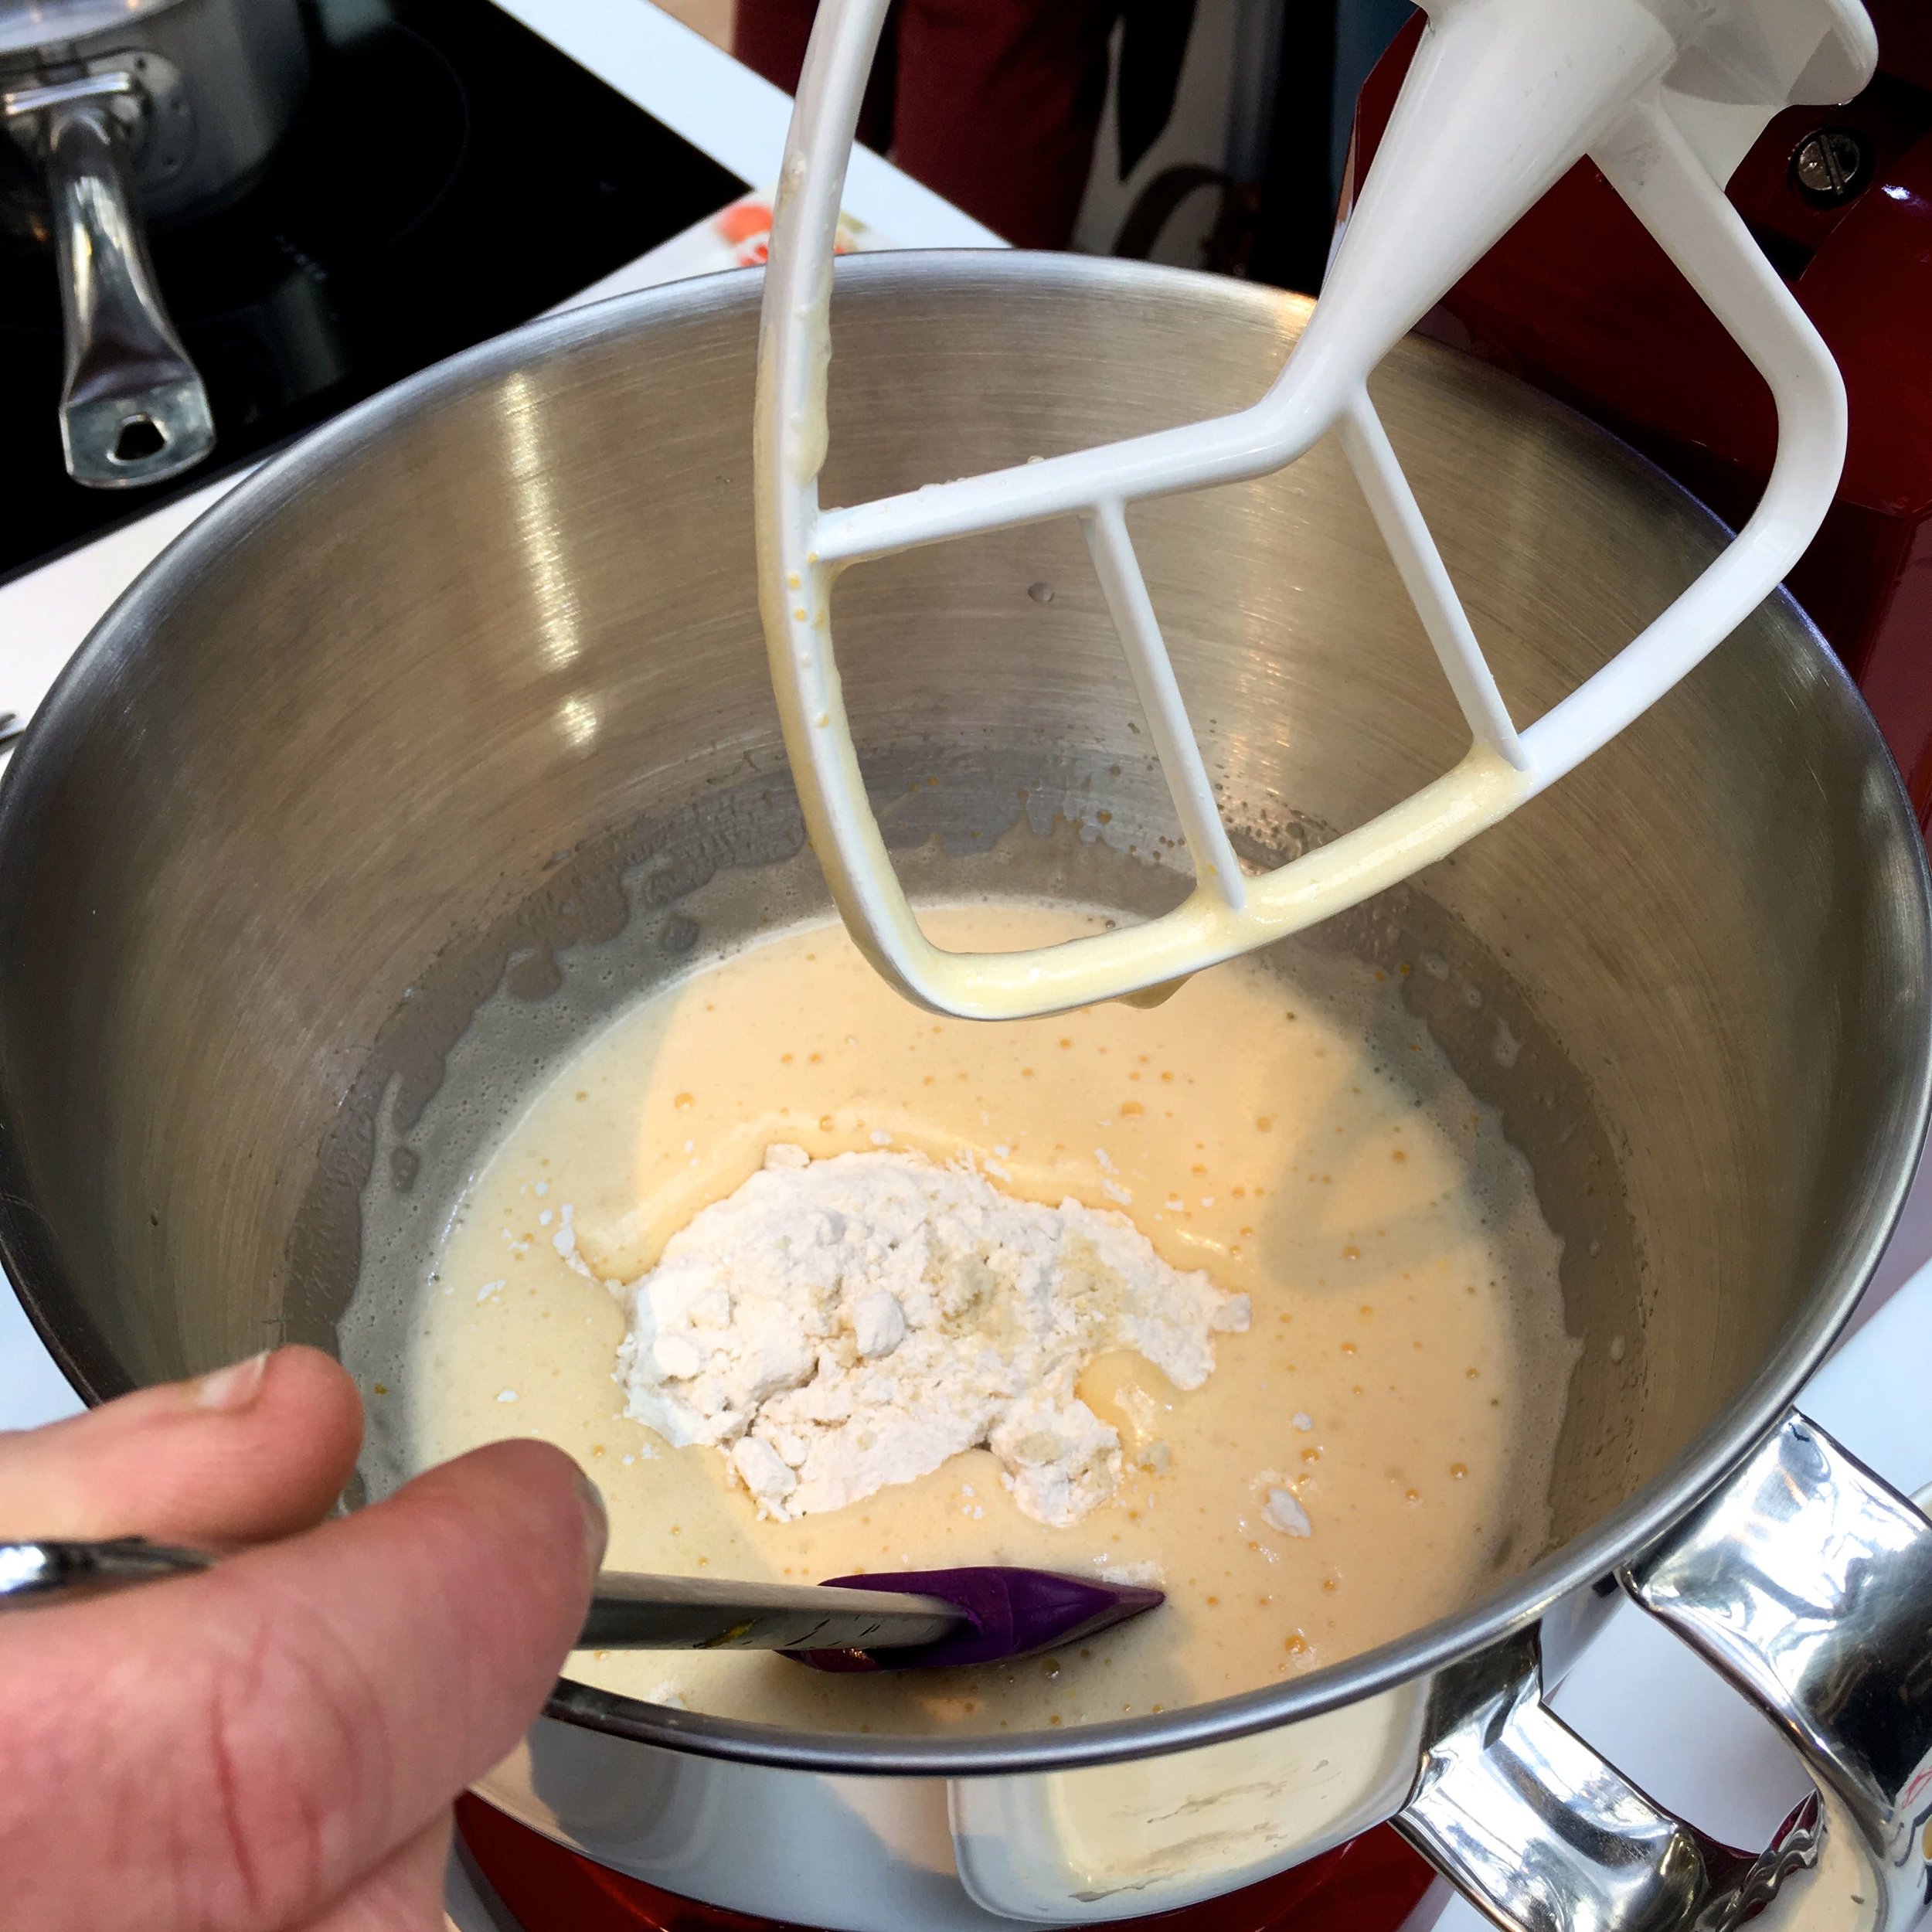
5. First we added flour and ground almonds to the eggs and sugar, along with some orange zest, and carefully folded this in.

madeleine mixture spooned into the silicone tray

7. We piped the mixture into the madeleine tray. In all honesty this was the messiest bit, with a few "exploding" piping bags around the room. MOH, the baking perfectionist, wanted to wipe the dribbles but it was not to be!

A quick look at the other ingredients for the butterscotch sauce

9. While we waited for this to boil, I explored the other ingredients on the bench - cardamom, chopped pistachios and more butter.

Keeping an eye on the sugar syrup while it bubbles away

11. And still the water bubbled, until the sugar turned brown - and that's when you need to watch carefully, because it'll turn quickly.

The cooked madeleines were returned to our bench, next up decorating them

13. And before we knew it, our madeleines were back again, cooked and looking lovely. 

Getting started with the madeleines by melting butter

2. We started by melting butter, in fact you might have noticed I delegated that to MOH.

A squeeze of orange juice into the melted butter

4. While my eggs and sugar were getting fluffy, I still had time to direct MOH, and take some pictures too. Here's a squeeze of orange juice going into the butter he melted.

Adding butter and orange juice to the madeleine mixture

6. Then the orange juice and melted butter were also gently folded into the mixture. You'll notice MOH is working in these photos too.

Onto the caramel sauce, starting with the sugar and water

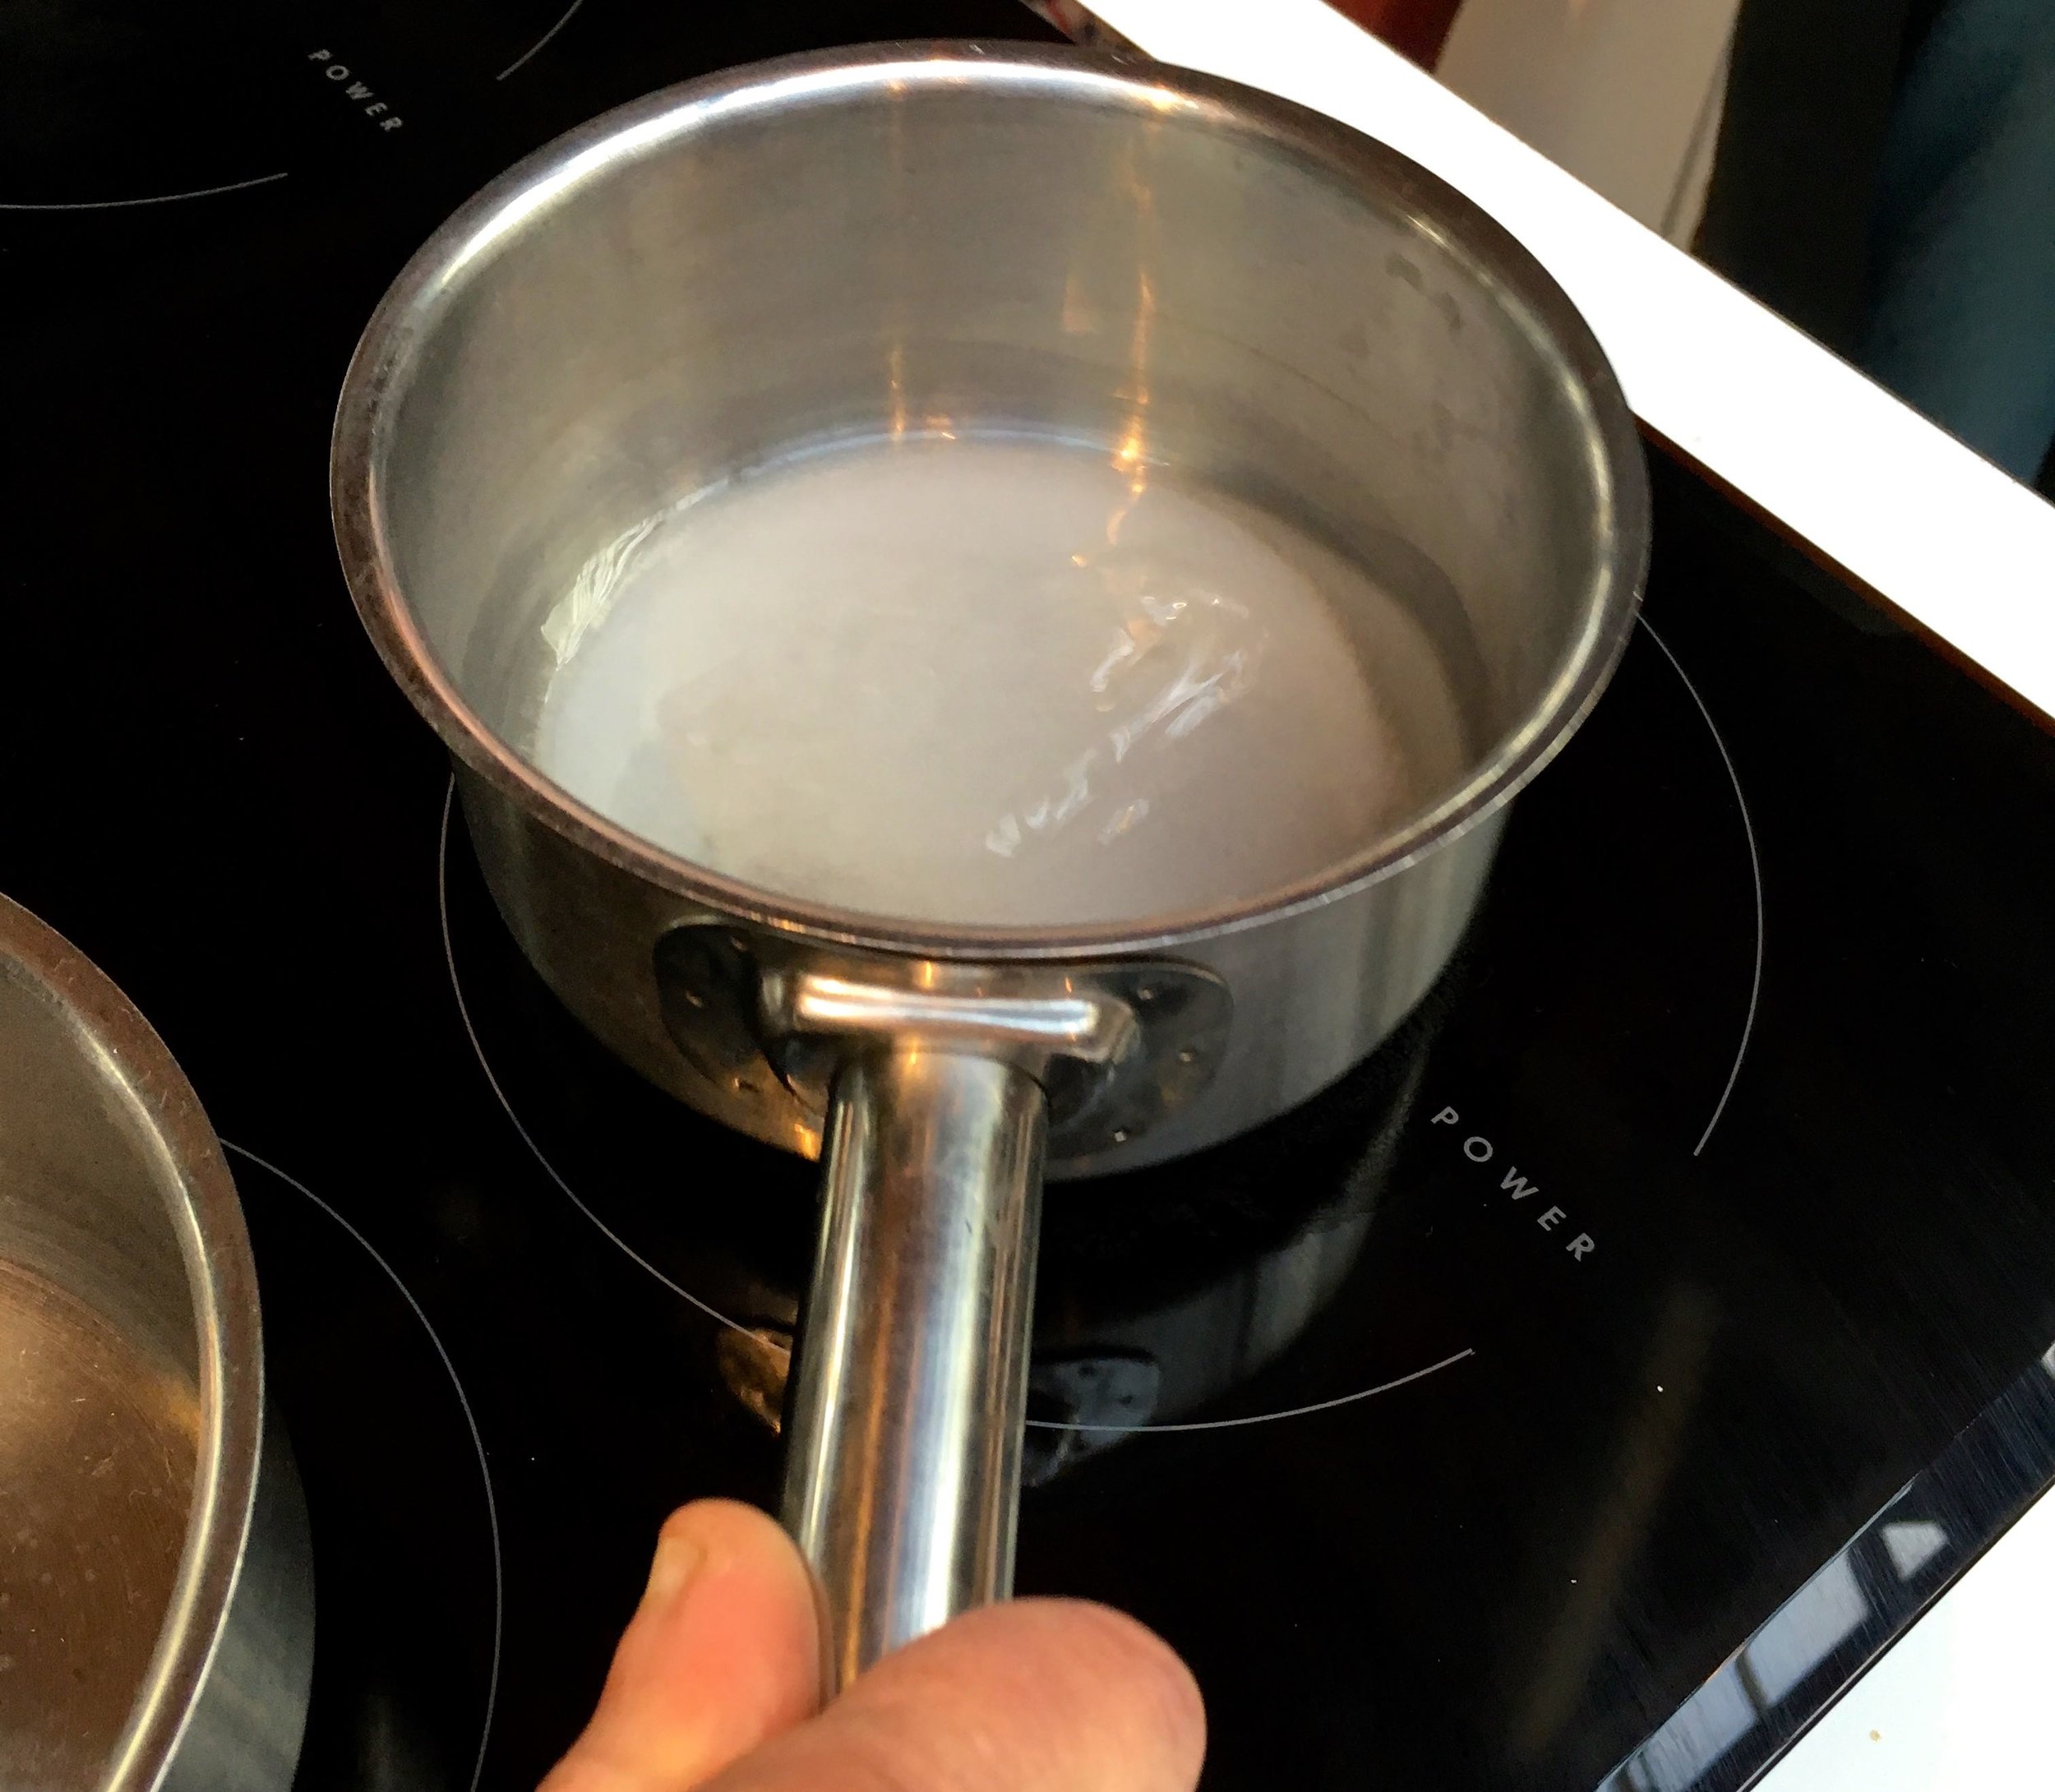
8. With the madeleines cooking, it was time to make the butterscotch sauce. We were both keen to see how this was done, as MOH had tried this at home, not altogether successfully. So water and sugar went into the saucepan...

Melting some chocolate directly in the saucepan on a low heat

10.  In preparation for decorating the madeleines I melted some chocolate slowly in a saucepan. At home I use the microwave...

And voila butterscotch caramel sauce - and quite a bit too - yum

12. Then MOH whisked in the butter, and then added the cream and cardamom and voilà, cardamom butterscotch sauce! Two tubs of it. 

A drizzle of chocolate and a sprinkle of pistachios, with a modern take on how we decorated ours

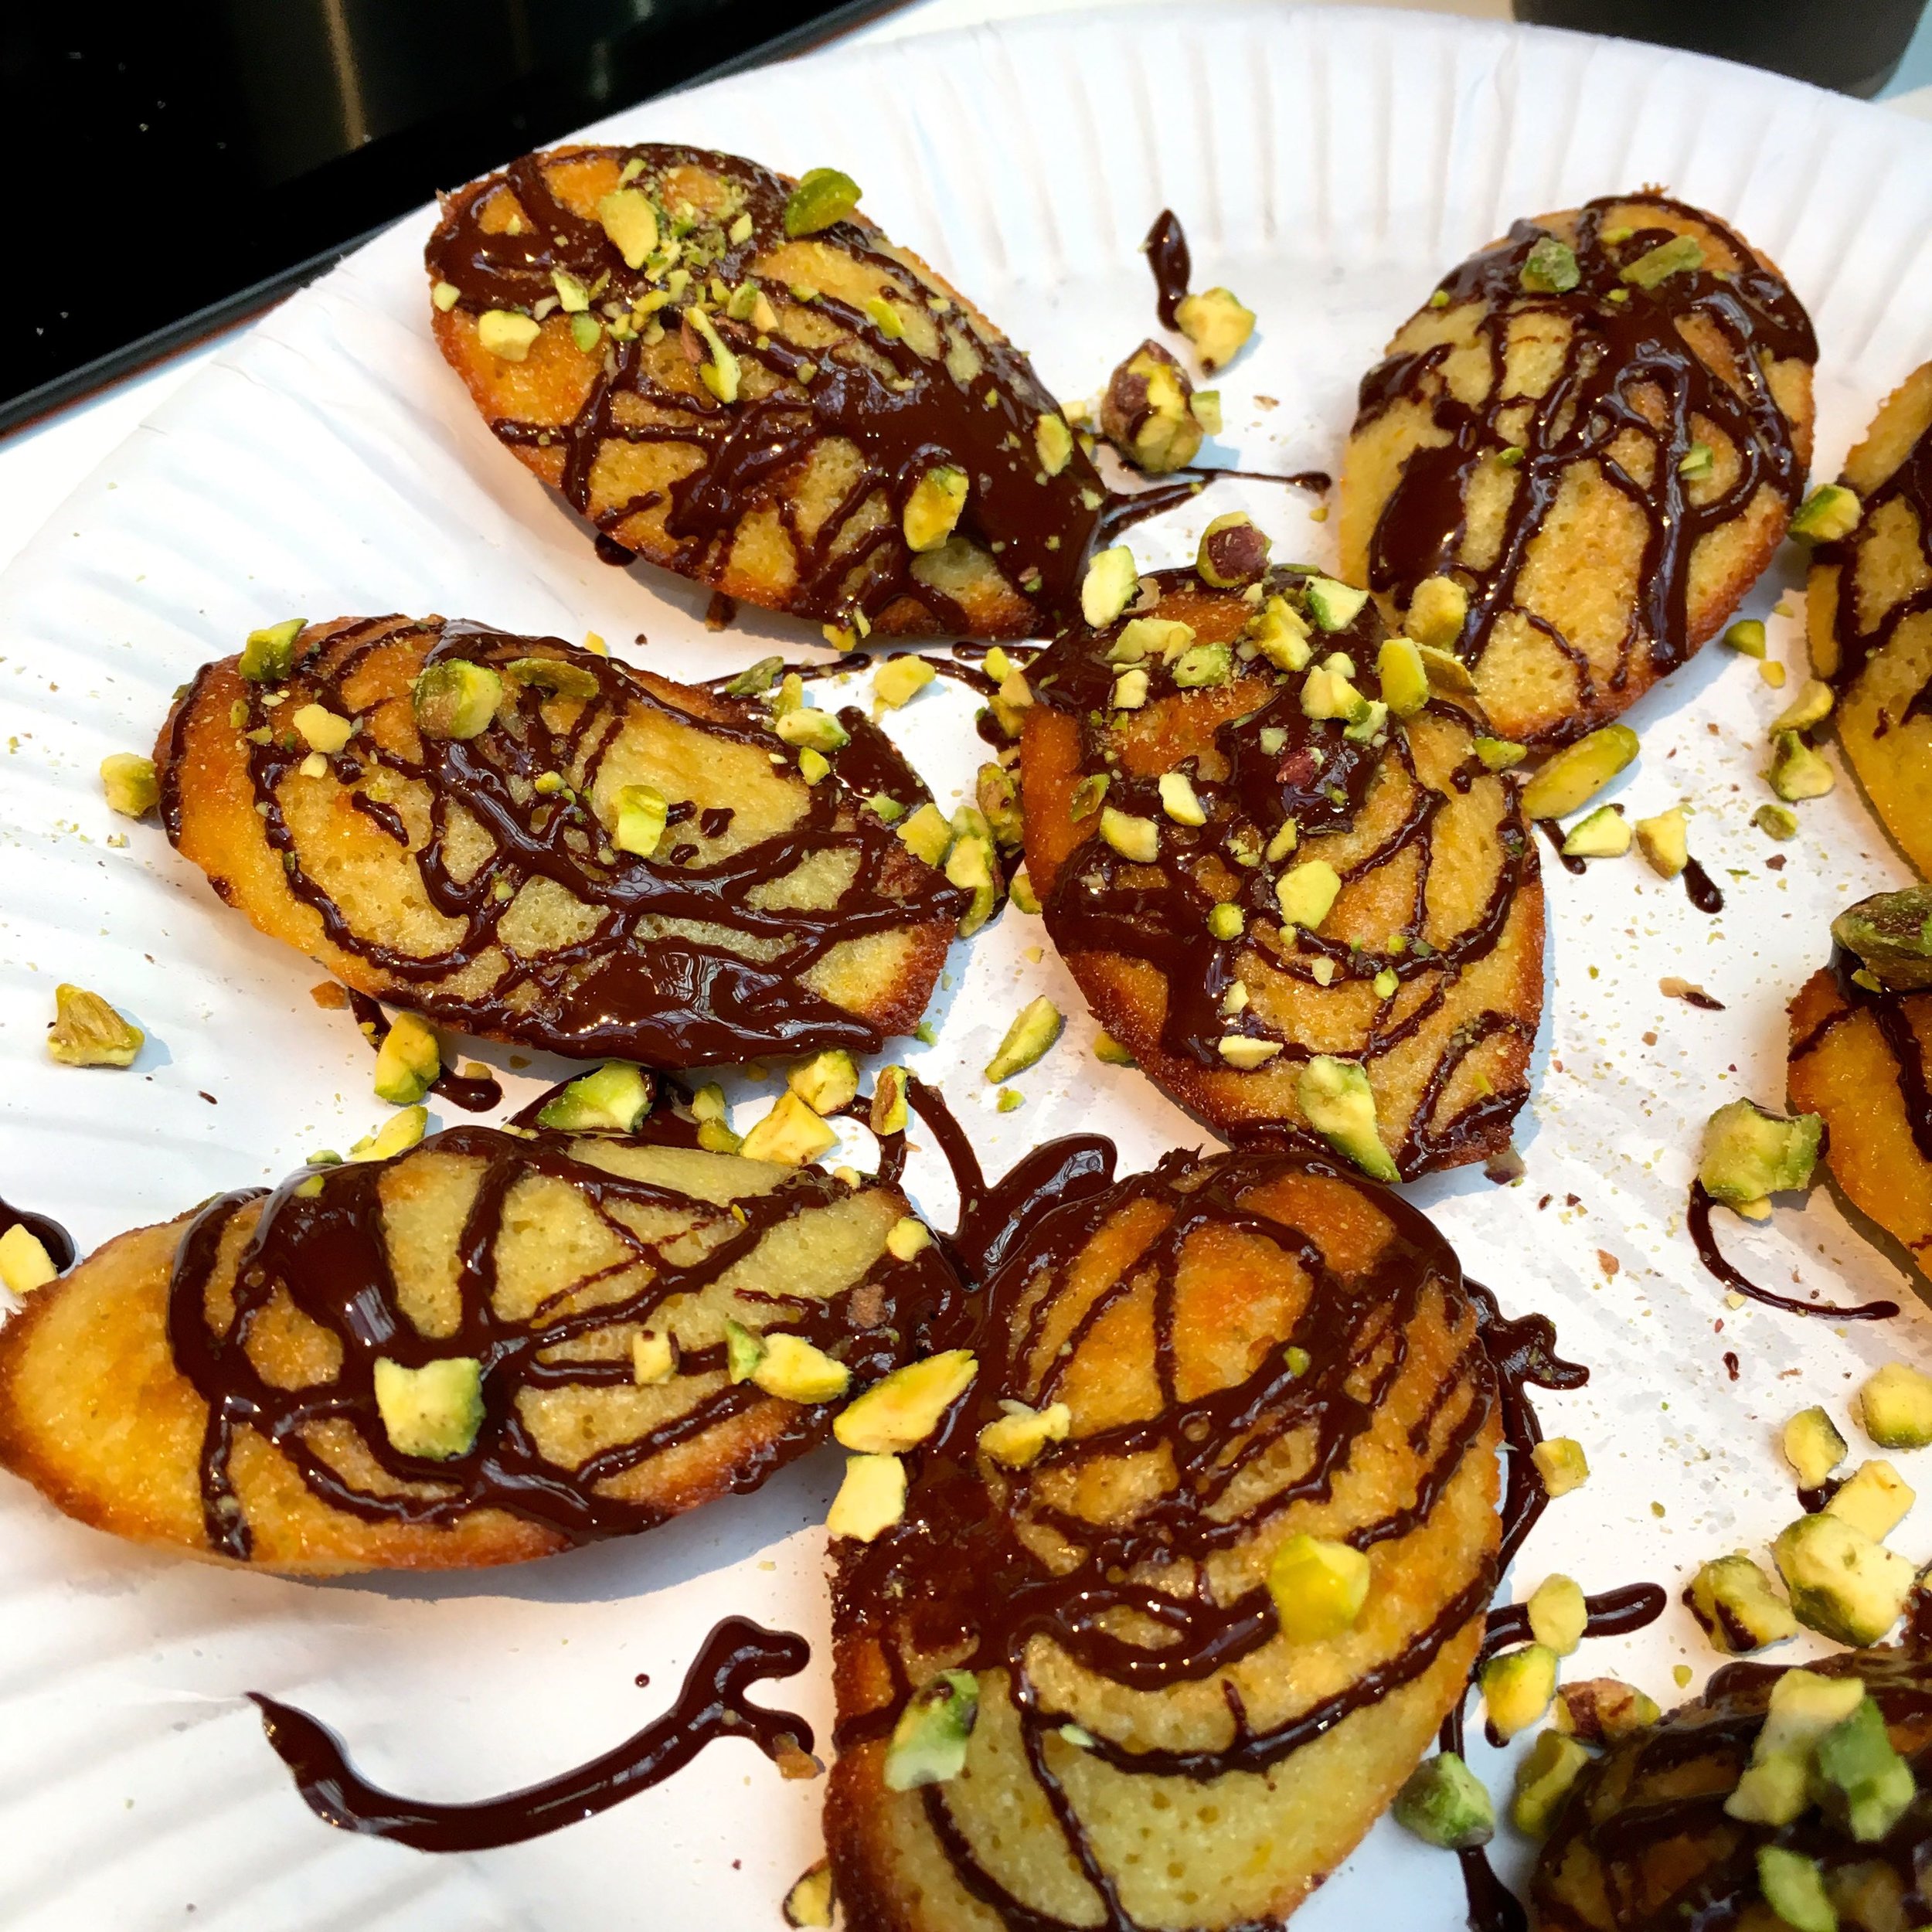
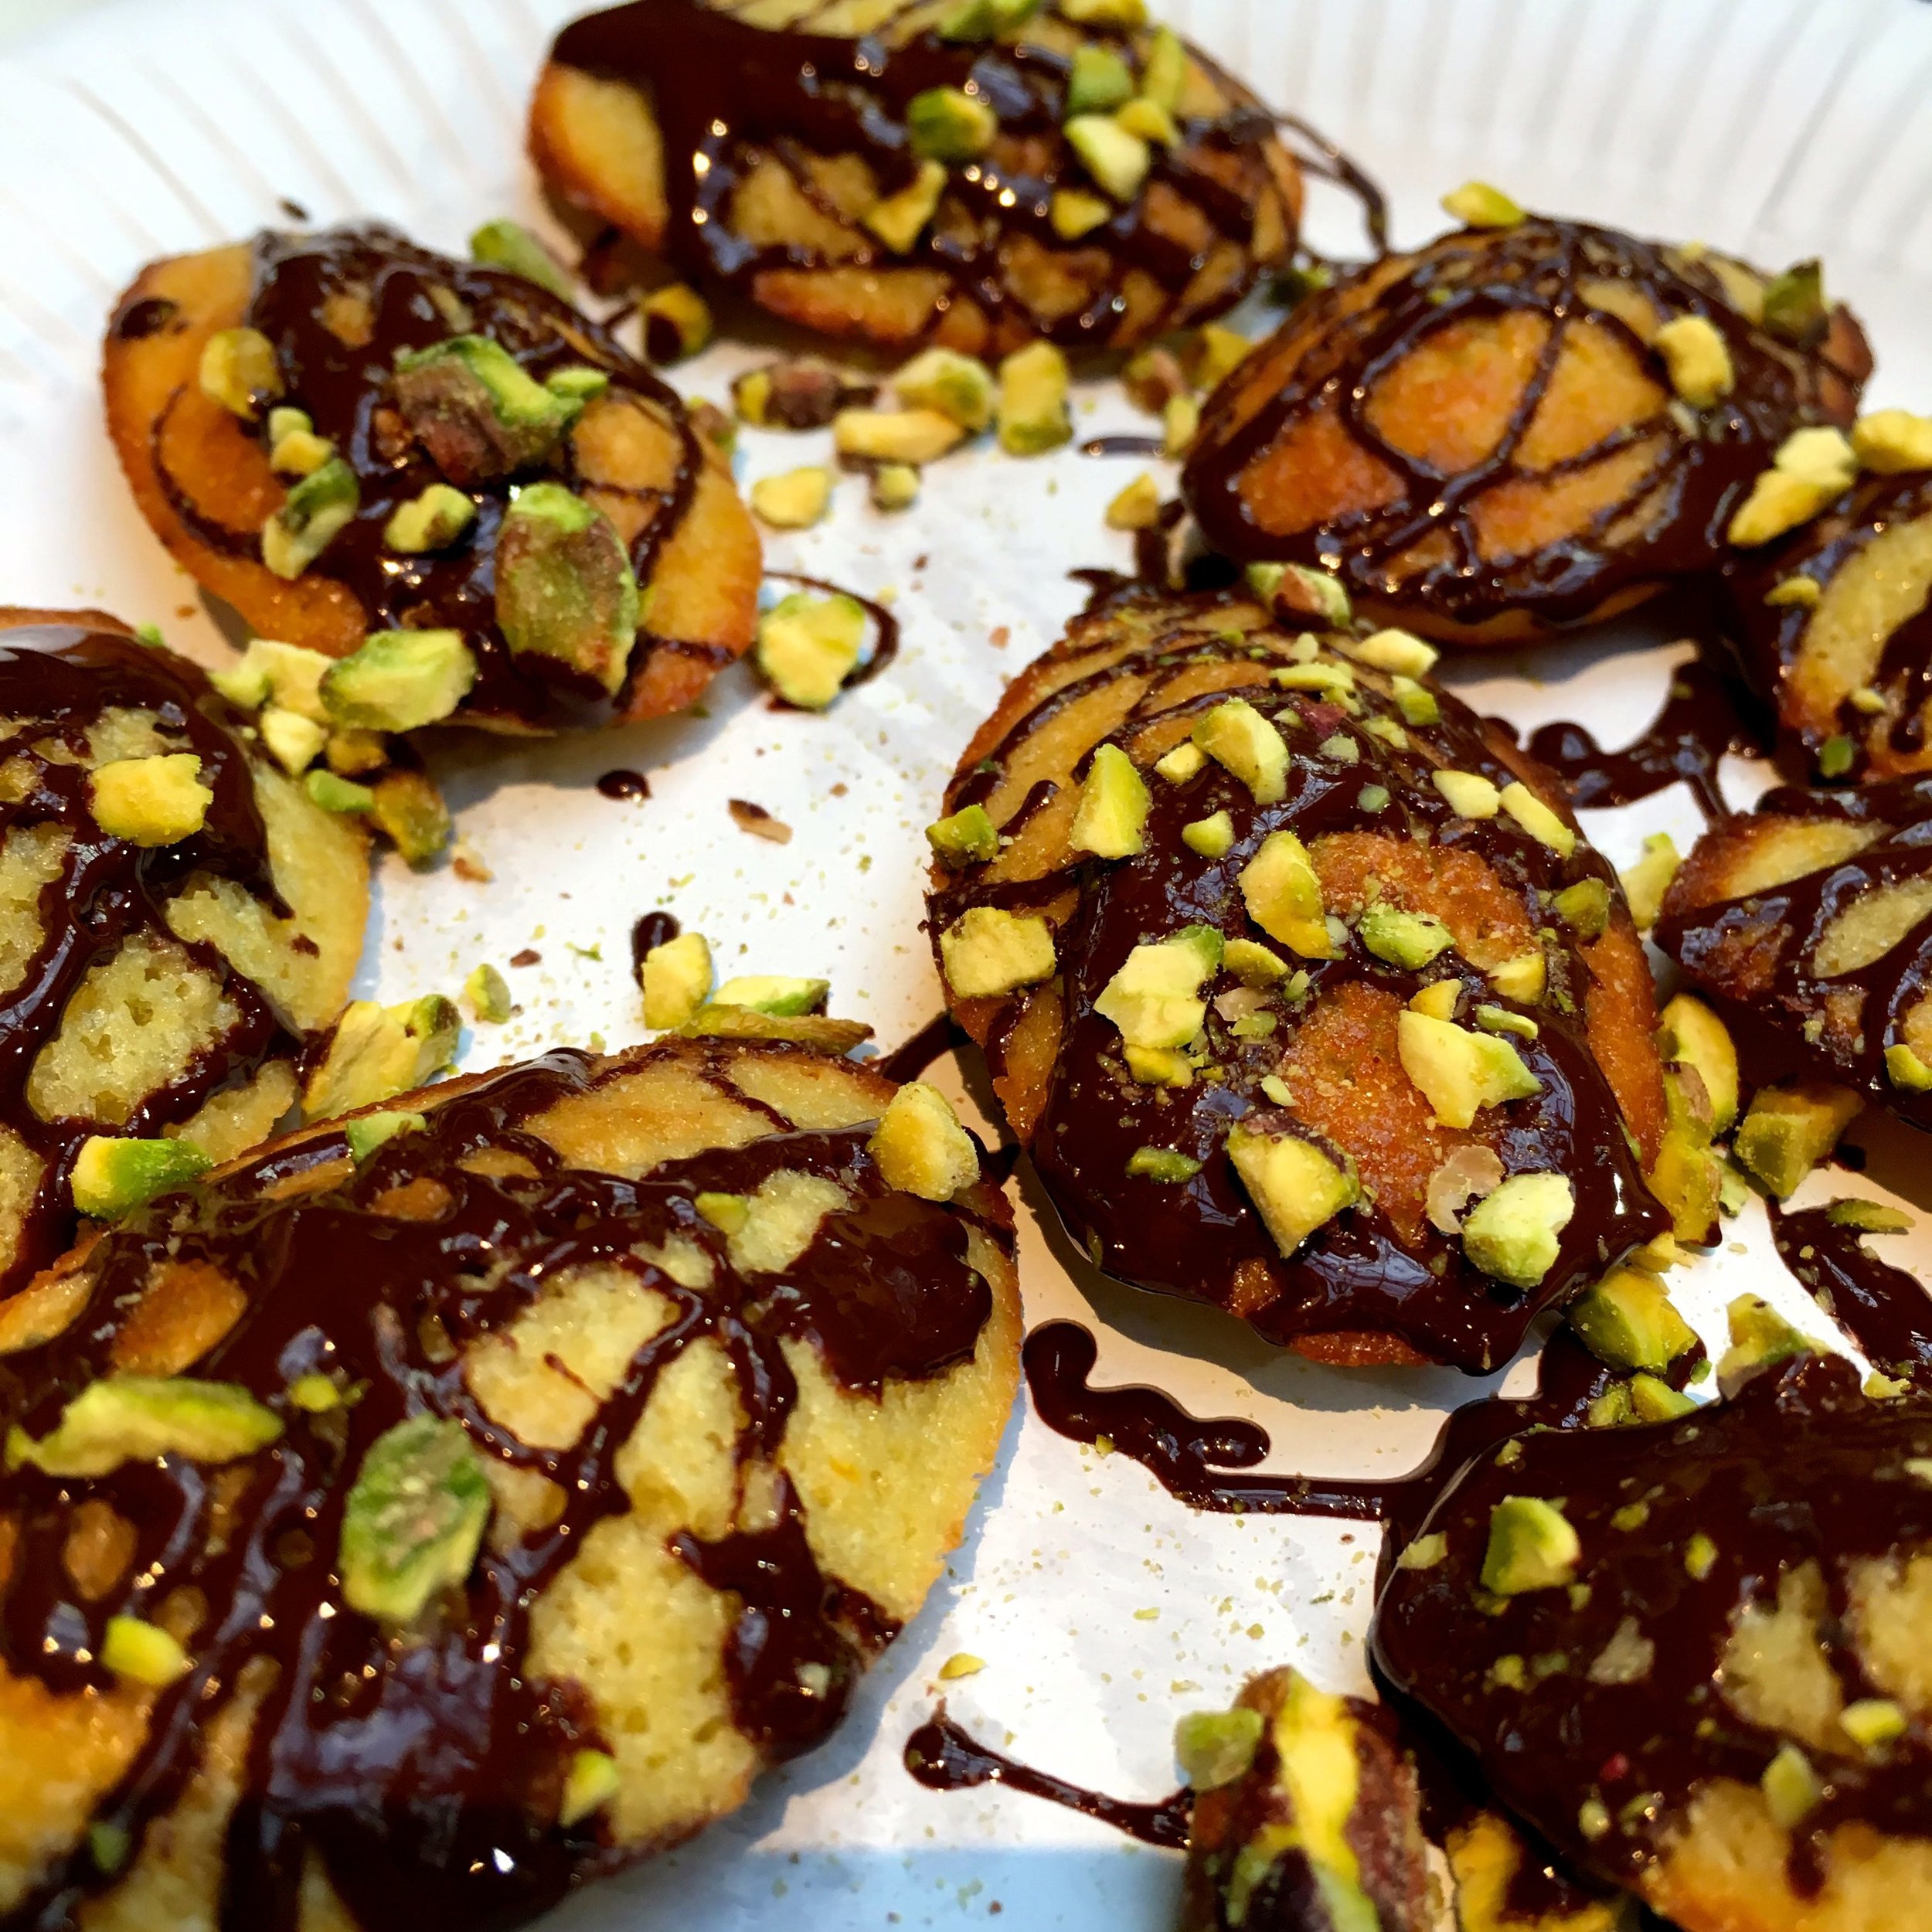
14. With a short amount of time to decorate, we went modern, with dribbles of chocolate and sprinkles of pistachios. 

And the final result, was some very moreish orange, pistachio and chocolate madeleines with cardamom butterscotch sauce. I'd never have thought it would be *that* easy to make them, but it was. And now I need a silicone madeleine tray of my own, so I can make plenty more! 

ORANGE, PISTACHIO AND CHOCOLATE MADELEINES WITH CARDAMOM BUTTERSCOTCH SAUCE, RECIPE BY KATHY FROM GLUTS & GLUTTONY BUT MADE MY MOH AND I IN 30 MINUTES...

ORANGE, PISTACHIO AND CHOCOLATE MADELEINES WITH CARDAMOM BUTTERSCOTCH SAUCE, RECIPE BY KATHY FROM GLUTS & GLUTTONY BUT MADE MY MOH AND I IN 30 MINUTES...

With madeleines made in record time, we left the kitchen and tried them out while planning our route through the rest of the show. Look out for more posts from the show soon.

* This is a collaborative post, and with thanks to AEG and Kathy from Gluts & Gluttony, as usual views are my own.

Post Comment Love and Blogger Showcase 2-4 December 2016

Hello and welcome to Post Comment Love.  If you were here last week, thank you it was great to see you and sorry - it seems my winter picture from last week was a bit of a forecast for the weather here this week! If you're new here this week, welcome!  Morgan and I hope you find our growing #PoCoLo community friendly and supportive, and we know you're going to find some great posts to read.

My photo this week is from Greenwich Park, it really is a magical place and I make no apology for including yet another photo from there. We've had a couple of heavy frosts, but as that's coincided with the start of December, it's helped me start to feel Christmassy much earlier than usual. I've already posted a couple of Christmas posts, and I've a few more yet to come. 

The post I've linked this week is a competition to win a book that's made it onto Richard & Judy's Autumn picks, so no mean feat, and it's a book that when I read it in September when it was released, I couldn't put down. It's a simple competition, all you need to do is leave a comment on the blog post to enter, don't miss out on this great read. 

A frosty morning in Greenwich Park, London

Blogger Showcase: Lucy from Lucy's Locket

1. Who are you? 

Lucy's locket blog

Hi! I’m Lucy from Lucy’s Locket.  I have an 8 month old daughter, Lilly. I use my blog as a space to reflect on life, motherhood and the quest for balance as a working mum.  Aside from my blog, I work part-time as a lawyer for a small law firm in Perth, Australia.

2. Why did you start blogging?

I explain why I started blogging in my very first post.

In short, I feel like I have a lot to say and no one to say it to. I don’t have close friends and family that are in the midst of this work/life juggle and those that are think very differently about it to me. I have a positive mindset and I want to interact with like-minded people.

In addition to this, I want to tell other parents about my experience in taking my baby to work with me. I am yet to meet another person who does this, but I know they must be out there! There are so many benefits to taking your baby to work. I’d love to see this become more common.

3. What do you find most challenging?

I have always struggled to articulate how I feel. I am hoping that blogging will help me to improve on this.  Many of my posts end up being quick thoughts rather than well thought out posts. I usually have much more to say on a particular topic, but I struggle to get the words out so I just post it as is.

4. What is your favourite topic to write about?

At the moment my favourite topic is about work/life balance. I know it’s overdone, but I am really passionate about it. I think many people are too quick to focus on the difficulties of balancing paid work and parenting.

5. Are you blogging for fun or do you have goals?

Just for fun. I don’t expect to make any money from my blog, but I do hope that blogging will help me to improve my writing skills.

6. What is your favourite thing about blogging?

The community. I wanted to meet people with similar values and interests and I’ve done just that!

7. What are your three best posts?

8. Describe yourself in three words!

Positive, independent, kind.

9. Are you a tea and biscuits or coffee and cake person?

Can I be both? I enjoy a good tea, but since I started taking my daughter to work when she was a newborn I have been treating myself to a coffee each morning and have become a bit of an addict!

10. Your perfect night in?

Not long after having my daughter we were sat on the sofa on a Friday night. My husband was watching a film, I was drinking tea, reading a book and breastfeeding our new baby girl and our dog was curled up at my feet. That was perfect to me.

11. What would your best friend/OH/mum or kids say is your best quality?

I asked my husband a similar question a few weeks ago. He said I was dedicated. I liked that and I think he is right. If I am passionate about something I will give it my all. 


Thanks Lucy, it's great to learn more about you - thanks for joining in.  Please do pop over and connect with Lucy on her social channels here: Twitter  -  Facebook  -  Pinterest 

Getting to grips with Christmas

I don't know about you but since the weather has turned that bit colder and now that the calendar has moved into December, but I feel ready to get to grips with Christmas. As ever I've grand plans, which I'll no doubt review as it looms towards us.

Today I'm joining up with some lovely bloggers as we share our tips, and favourite crafts so we can all get to grips with Christmas. Or at least try...  

I'm sharing some Christmas crafts as I always have craft aspirations at this time of year.  You'll find much more inspiration and Christmassy-ness at the bottom of this post, below my pictures.

1. How to bleach pine cones

This is an easy craft to do, but you need some patience, and time. Last year I started this on December 18 and that was way too late as the pine cones needed longer than I anticipated to dry out. You might be wondering why you should bleach pine cones, but let me tell you they'll look as if they have a frosting of snow on them, and in which case, why wouldn't you?

You'll probably know this, but it's worth mentioning, when pine cones are wet they close up so it isn't immediately apparent if they've lightened. To dry the pine cones I placed them on lots of newspaper, but the process was speeded up by placing them on a shelf above a radiator. The results were some pretty and lighter pine cones.

My tips are:

  • Start earlier than you think you'll need to
  • Choose the more open sort of pine cones as these will give you the best results (see the bottom right picture below)
Place the pine cones in a bucket with bleach and stir with a stick
leave the wet pine cones to dry and watch them dry lighter from the effects of the  bleach
Pine cones float so weigh them down with bricks

2. How to make a homemade Christmas wreath

Making wreaths aren't as hard as you'd think. Florists sell the wire rings to use as the base, and for securing greenery too, but you can also make your own by shaping a wire coat hanger. I discovered that the key to making a wreath is to make up bunches of greenery and to attach those to the wire ring starting on the sides. Once you've mastered attaching the bunches of greenery you're ready to tackle how to approach the top and bottom sections. And remember it's your design so you can make it up as you go along, no one will know.

It's rewarding to see it take shape, especially for someone who was a complete novice tackling the wreath in the photos, and to be honest I still am.  Once the base evergreens are covering the ring, you can start to decorate. I found ivy hard to use so discarded that idea and instead used holly, bay leaves and rosemary, all of which I have growing plentiful in the garden. 

With all the greenery in place, I added small silver baubles - which I bought already wired - by poking them through the evergreens and securing them on the reverse. And I'm still rather pleased with how it turned out.

I bought some christmas tree offcuts and supplemented this with evergreens and ivy from the garden and had way too much for one wreath
continue securing greenery to the wire ring using florist wire
Florists sell the wire rings, but you can always make your own with a wire coathanger
decorate the wreath with baubles, holly, and herbs

3. Inspiration for some gorgeous gift tags

This is another craft that looks more complicated than it really is, and that's perfectly fine with me!  Here I've folded squares of material to create some Kanzashi flowers which I've used to embellish plain cardboard gift tags, you know that craft stores sell in packets of 100s. Each two inch square you cut, is folded to make a single petal, which are then joined together. 

My previous post on this gives a step-by-step guide on the folding needed and how to assemble the flowers. How you embellish them is entirely up to you, but as you can see with trimmings and buttons they can become something very special. And not something to be thrown out with the rubbish, or at least I hope not anyway!

starting to fold material squares to make some gorgeous gift tags
Threading the material petals onto cotton to make the flowers
Creating material petals for the flowers on my christmas gift tags
the completed christmas gift tags, gorgeous aren't they

But that's not all, here's more Christmassy ideas and tips

Catherine at Growing Family is sharing her tips for bringing the outside indoors this Christmas. Find out how to make easy pine cone tree decorations, how to use Spring flowering bulbs to create lovely homemade gifts, and how to choose the perfect real Christmas tree.

After inviting family for Christmas Lunch, Morgan at Morgan's Milieu shares her tips and advice for planning Christmas Lunch for a large number of guests.

Jingle Bells, Christmas smells - it really does.  Nicky at Not Just The 3 of Us is talking about the memories and smells that Christmas decorations evoke.

Jane at Maflingo has great ideas for festive treats to make with the kids this Christmas. Find out how to make Santa Fruit Skewers and Festive Chocolate Pretzels.

Jocelyn at The Reading Residence is sharing some fun and easy Christmas crafts for children. Find out how to create a Christmas centrepiece, a festive arty keepsake and make kids placemats.

Kirsty from Hijacked By Twins is planning every meal including how to use up those precious leftovers. Find out how to make a delicious toppings for the perfect leftover Christmas dinner soup. This recipe will make you want to cook extra just for the leftovers.

Caro from The Twinkle Diaries shares a simple idea for creating edible Christmas tree decorations.

If you're anywhere near the UK capital this Winter, Nell from the Pigeon Pair and Me tells you how to enjoy the festive fun of London - for free. She also gives her top picks of Winter family shows, and explains why Christmas with kids is a magical time of the year.

Have we inspired your Christmas preparations?  Let me know what you get up to!