Sean Murray's Great Chelsea Garden Challenge

I recently discovered some unedited and mostly un-looked at photos from Chelsea in 2015, and as I won't be at Chelsea this year, I thought the timing fortuitous so am sharing some of those, now edited photos, today. 2015 was the year the BBC and RHS partnered on The Great Chelsea Garden Challenge TV programme with the winner fulfilling their dream to design a garden at Chelsea. 

Now wouldn't that be fun. And, no doubt, a lot of hard work. We watched the series avidly - armchair gardening really was the best that year!

In his Chelsea garden the winner, Sean Murray, created a front garden for a couple of keen gardeners nearing retirement. There's an abundance of plants, and practical off street parking too, and I suspect there's another message in there for all of us that have very little greenery in our front gardens.

The Great Chelsea Garden Challenge 2015 - a front garden by Sean Murray

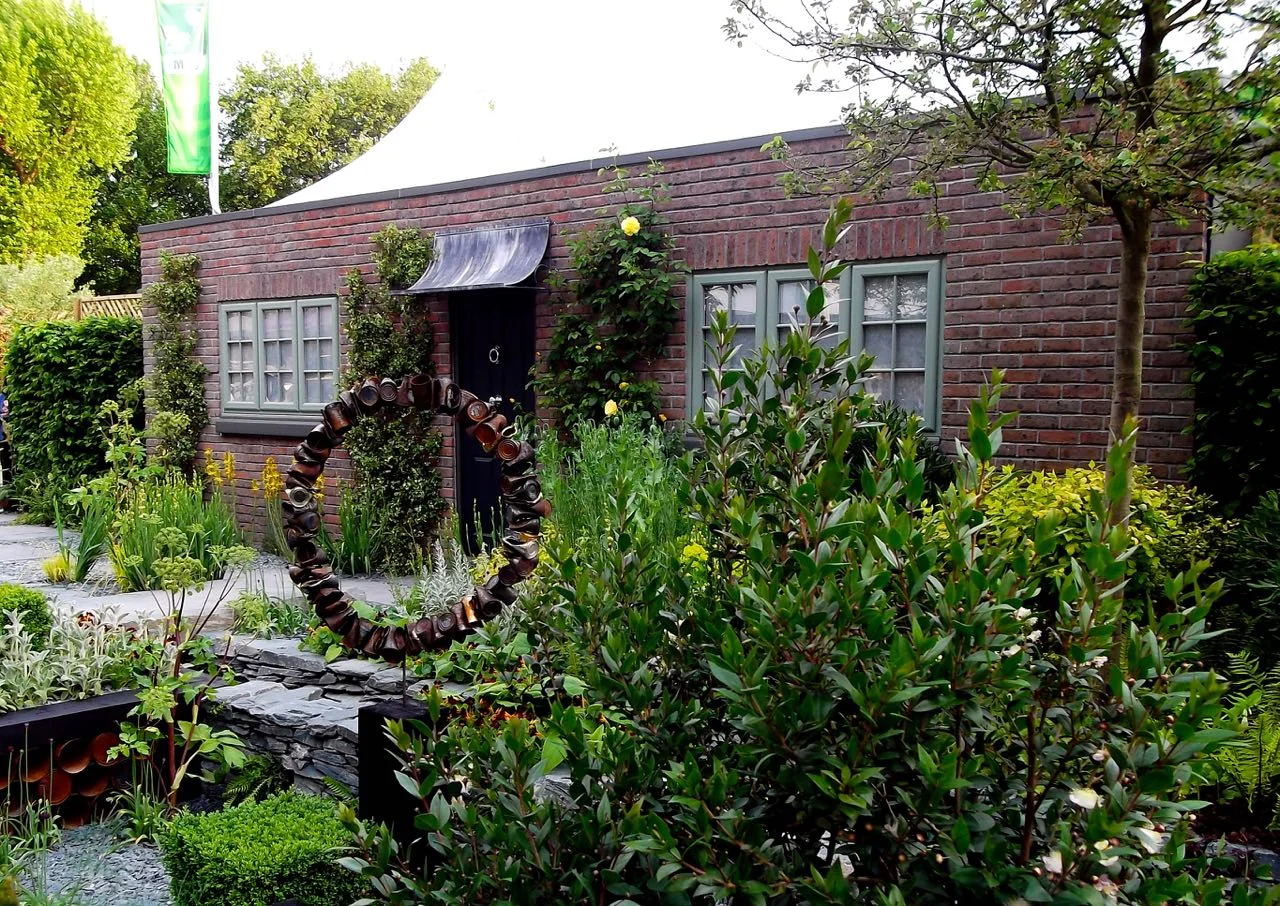
At the time I remember thinking I didn't think much of the roof of their house - isn't it funny how those things stick with you? I know it's just a facade, but there you go. Looking back there's a lot of stone and slate in this garden as well as more natural and realistic planting, even for keen gardeners, so you've a feeling that they'll actually have time to sit down and enjoy the garden too.

The sunken garden worked well, and is much more adventurous than lots of front gardens, which for many - and me included - is somewhere to park the car and somewhere that leads to the front door. I wonder though if having a prettier front garden would encourage me to spend more time in it, or if the busy main road would still dominate. I think the latter, but I do wish we had more greenery there - maybe one day, if logistics can be worked out and around - ours is a complicated space, used by us and the three flats next door.

The sunken garden element of The Great Chelsea Garden Challenge 2015 - a front garden by Sean Murray

Even then - before I re-acknowledged my love of yellow - it was the yellow flowers that drew me in. And lupins too, another favourite, which although a favourite I'm still struggling to grow. I've some seeds in the greenhouse which are resolutely refusing to do their thing (so far)

Lovely yellow lupins softening an area of The Great Chelsea Garden Challenge 2015 - a front garden by Sean Murray

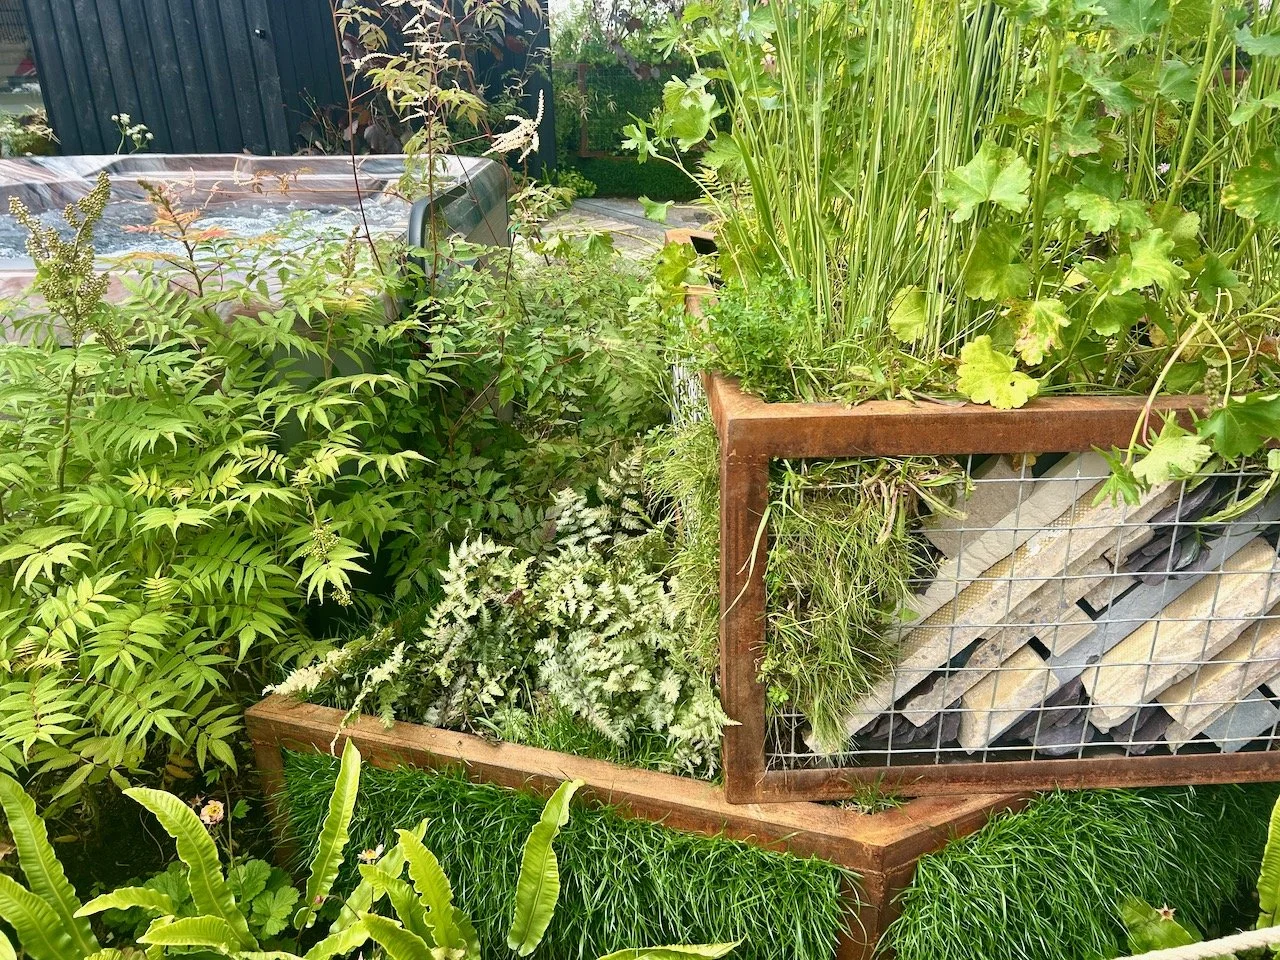
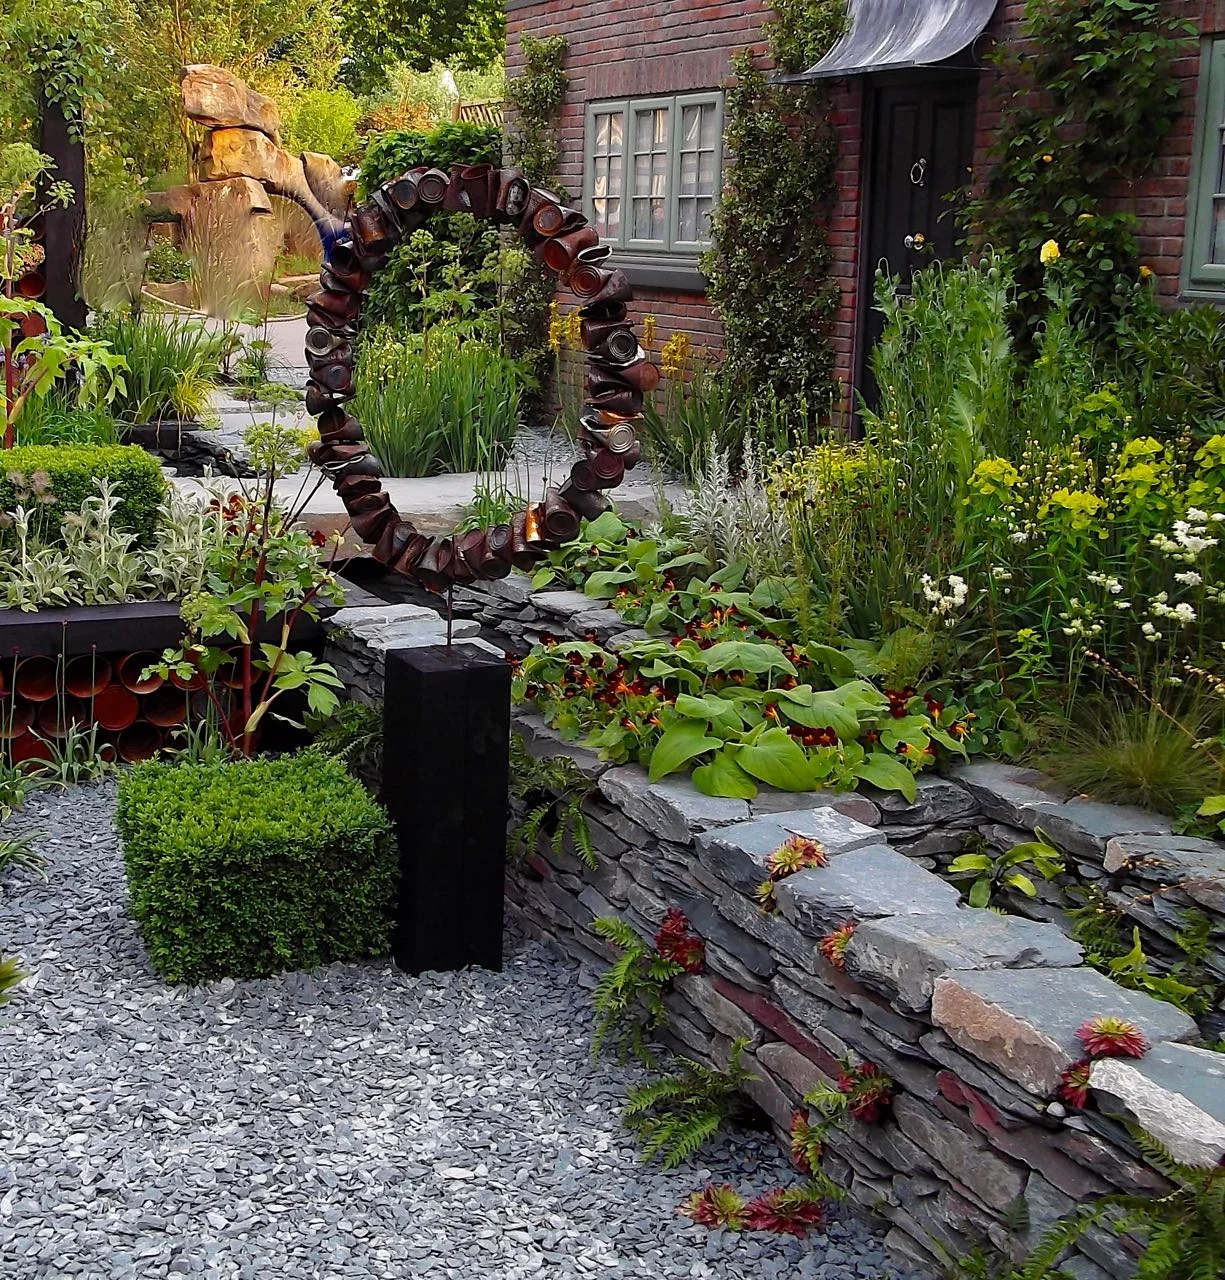
The sculpture looks great, but even though MOH admired it I think I'd struggle to get him to agree to a "ring of old rusty tins" in our garden space, let alone the catering size tins under the bench seating.  And it is a lot of tinned tomatoes to eat isn't it?

A look at the garden sculpture used in The Great Chelsea Garden Challenge 2015 - a front garden by Sean Murray

While we were there the winner of the TV programme and garden designer, Sean Murray was talking to people admiring his garden. And who could blame him, it was definitely his moment to shine. Shortly after his competition win he quit his job to become a full-time gardener and by all accounts he's still doing that today, having recently designed a community garden for a local mining village, so that's great to know.

Sean Murray in his garden for The Great Chelsea Garden Challenge 2015

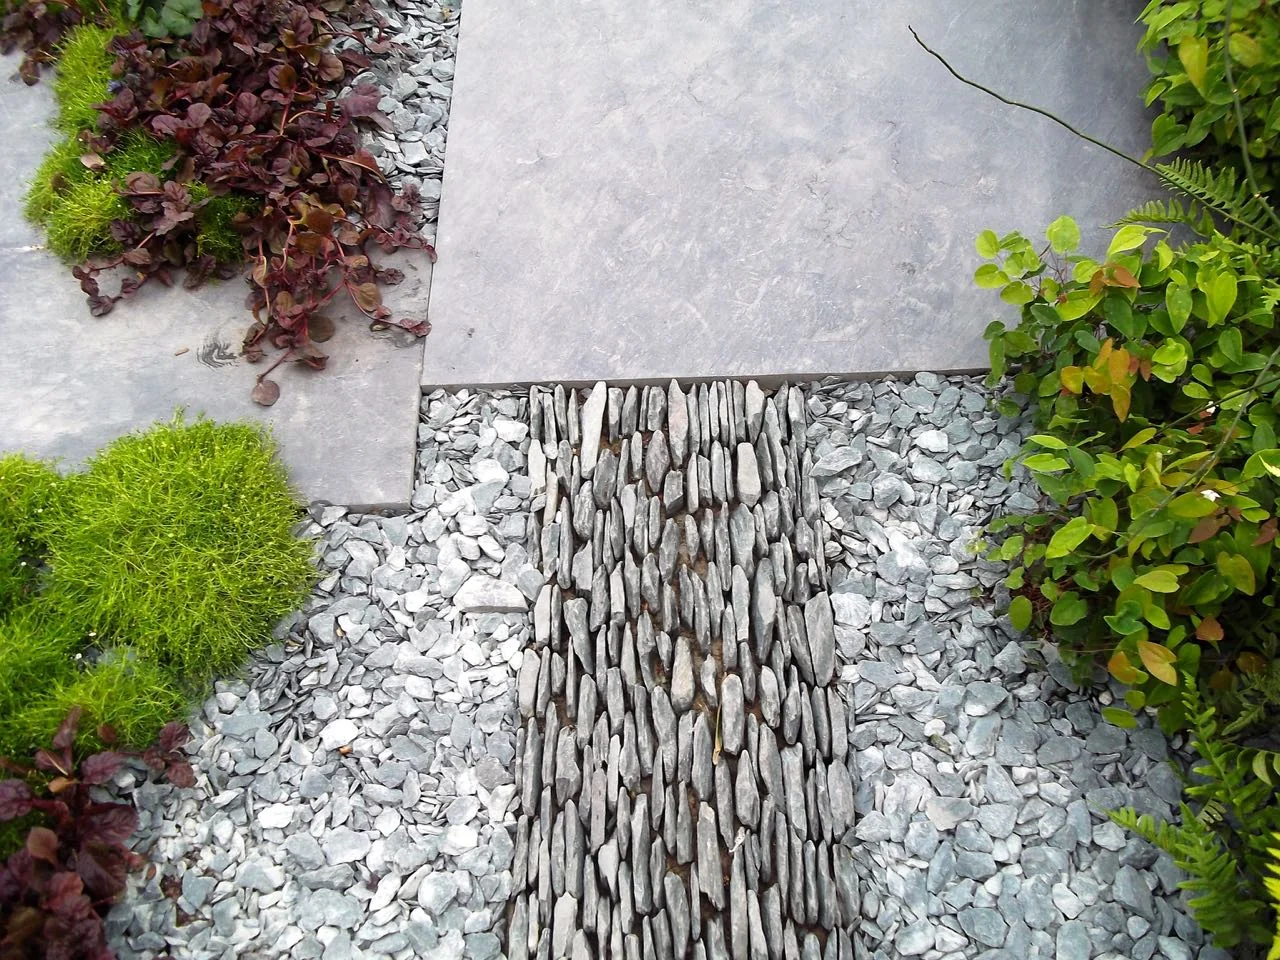
As I flicked through the photos it was these slate ones that jumped out at me. I hadn't realised at the time that this "river" of sedums and alpines was the off street parking area - surely it's way too pretty to plonk a car on top of?  My car rarely moves off the drive these days so I wonder how they'd cope, but isn't it great to challenge our idea that parking spaces have to be dreary.

Pretty and practical off street parking in The Great Chelsea Garden Challenge 2015 - a front garden by Sean Murray

And take a closer look. I know it was a Chelsea garden, but the attention to detail is phenomenal. I think I mooted the standing the slate up on its edge approach to MOH at the time in our own garden, and you're right, we didn't do it, nor even consider it. But it's a great look.

Intricate slate patterns in The Great Chelsea Garden Challenge 2015 - a front garden by Sean Murray

What do you think - would a front garden like this work for you?

Circles, spray paint and another plan for my garden

Well by now I'm pretty sure you know just how much I like a plan!

Our long held plan for our grass - or lawn if we're feeling posh - has been to give it more definition and shape it into a series of intertwining circles. We know that doing this will make our garden look better as our grass has sadly lost its edge and is looking a bit ragged.  

The thing that has been holding us back though is getting it wrong. What we realised this weekend is that it's only spray paint.

We'd bought a can of spray paint with the intention of marking it out and getting going a while back, but after getting all low-tech with a bit of string tied to a stick to mark out the circles, we sprayed our first circle and then came to a grinding halt when it all got a bit too tricky. 

And now a year or so on the grass isn't getting any better. The edge isn't righting itself and I knew we needed to do something about it. Even our gardeners (who cut the trees, mend fences and lay patios) advised us to give our grass an edge the last time they were here. I think they were angling for more work, but have obviously been disappointed!

So there was nothing else for it. We found the now rusting spray can of paint in the shed (miraculously) and set about trying again. This time freehand. What was the worse that could happen?  Well, yes we could have a lawn full of random white marks, but if we got it wrong it would wash off in the rain...

So with spray paint in hand, off I went.  And then I popped upstairs to view my handiwork:

marking out circles on the grass

Hmmn. 

I wasn't happy with a couple of the circles:

  • the first one (at the bottom of the picture) as the gap between its edge and the patio was too big - even with the small extension I have planned for our patio. Yes it's a new patio, but as I have enough slabs leftover to extend it by one slab's width and to add a dedicated spot on the right for MOH's barbecue, it seems rude not to. And it saves me a job of getting rid of them elsewhere... because they're far too nice to use at the allotment.

  • and the second one which apart from not really looking like a circle, was probably too big. Making it smaller (see the picture below) looks more balanced I think.

So with these changes marked in my head off I went and sprayed some more.

take two

Yes, that looks better. 

And yes we now have lots of random white, sometimes circular patterns marked on our grass and you know what? I'm now more certain it's the right thing to do. What do you think?

This is what it looks like looking back to the house:

circles everywhere

In the gaps between the beds and the edge of the grass circles we'll lay some slate. We probably don't have enough but we've been harbouring a tonne of the stuff since we bought our patio slabs so it'll be nice to see it spread around at least part of the garden at last.

Our next job was to measure how much edging to buy.  This involved MOH and I draping a 5 metre tape measure around the outside edges of the circles - the ones you can see here and a larger part-circle which is obscured by the in-flower yellow forsythia which also hides my greenhouse and MOH's shed from view. 

With a ten percent addition for slack measuring and some leeway, we made it sixty five metres which is quite a lot of edging. Eek!  I'm between two companies right now who both sell metal edging which sinks into the ground with the help of a mallet. If you've got something similar I'd be interested to know what you used,  what you think of it and if you'd use it again.

And all of this not only confirmed how much I like a plan, but also how much of a visual person I am. I could have measured the slabs to make sure we had enough for the extra row of patio, but oh no it made much more sense (to me) to lug the slabs down the length of the garden and lay them roughly in position. Then when I was happy it would work, we took them back again. If our neighbours were watching I'm sure they'd have been amused with all of our gardening antics last weekend.

planning the patio layout

So with a rough plan in place, I now need to:

  • contact the gardeners about laying the patio extension

  • find out how much skips cost

  • look for a random piece of paper which is a deposit we put down on some edging at the Chelsea Flower Show a good few years ago which of course I've now misplaced

  • decide and order the edging and get started.

And then I can move onto the next phase which involves sleepers and even more digging.  I'm definitely feeling inspired and I think this year we could actually get it done. Wish me luck!

Home Etc

Making cute pom-pom Easter bunnies and chicks

Recently I saw some cute pom-pom Easter bunnies and chicks on Pinterest, and well you know how much I like to try some of the things I see on there, I thought I'd give these a go. I looked at the original post and thought it should be relatively easy enough to do. In fact the trickiest bit was probably drawing the templates, but I reckoned that they didn't need to be perfect and just needed to look enough like a bunny or a chick - you might already have seen these on my Easter tea party post on Sunday!

So with my bunny template and some small scraps of wool I was ready.

Pom-pom Easter bunny template

1. You'll need two bunny shaped cut-outs and then simply wind the wool from the centre hole around the bunny's middle.  I used small lengths of wool as that made it easier to get it through the central hole. As the hole filled up I found using a crochet hook invaluable to guide the wool. 

Start the pom-pom

2. I decided to have multi-coloured pom-poms; to join the second colour just tuck the end under the wool as you continue to wind the wool through the hole. If it's longer than the rest it doesn't matter as you can trim it later.

This took me right back to making pom-poms as a child, although we stuck with circular pieces of card for the traditional round pom-poms.

Adding a second colour

3. When you've wound as much wool as you want around the card - remember the more wool you wind, the fuller your pom-pom will be - then it's time to cut the threads. 

Tip: keep your thumb firmly on the centre of the bunny!

Cutting the pom-pom

4. Then take another length of wool and tie it between the two pieces of card around the wool you've just cut.  Tie it tightly, this is what will keep your pom-pom together.

Tying the pom-pom

5. Draw a face, and you're done!  

To make them stand up unaided I've found folding the bottom edge out helps - you'll see what I mean with the chick.

Drawing a face

To make a chick

Repeat the same process, this time with a chick-shaped template.

Making an pom-pom Easter chick
Cutting the wool

And there you go, a cute and easy way to make a pom-pom Easter bunny and an Easter chick.  Winding the wool around the cardboard is quite soothing and easy to do, so it'd make a great craft to do with the kids.

Easter bunny & a pom-pom chick

What do you think of my pom-pom bunny and chick?

To see more of my Easter-inspired pins take a look at my Easter Pinterest board: